Overview
Mobulatr allows you to present your mobile designs in appealing, interactive and professional format.
Showcasing Apple, Android and Microsoft smartphone templates, you can upload multiple pages of your design, share it with a client and let them easily browse your mobile design, emulating real life experience.
– Apple, Android, Windows phone mockups;
– Create unlimited number of clients & projects
– Upload multiple mobile designs & navigate on each device;
– Add graphical mockups of your design;
– Multiple backgrounds;
– Add live emulators to check existing website compatiblity with mobile devices;
Server Requirements
These are the system requirements in order to use Mobulatr. If you are unsure whether your server meets these requirements, contact your hosting company.
– PHP 5.x (prior to 5.5)
– MySQL database
– mod_rewrite must be enabled
– Linux hosting preferred
Installation
Installation is really easy. All you need to do is upload application to your FTP and launch install.php in your browser.
Step 1: Download the application zip archive from codecanyon and unzip it somewhere on your computer. You will find 2 folders inside, “documentation” and “mobulatr”.
Step 2: Upload folder “mobulatr” to your FTP. If you don’t know how to connect to your domain(hosting) through FTP – please contact hosting provider and ask for assistance.
Step 3: Now, after mobulatr folder is uploaded to your FTP you can go to yoursite.com/mobulatr/
install.php and you should see following screen:
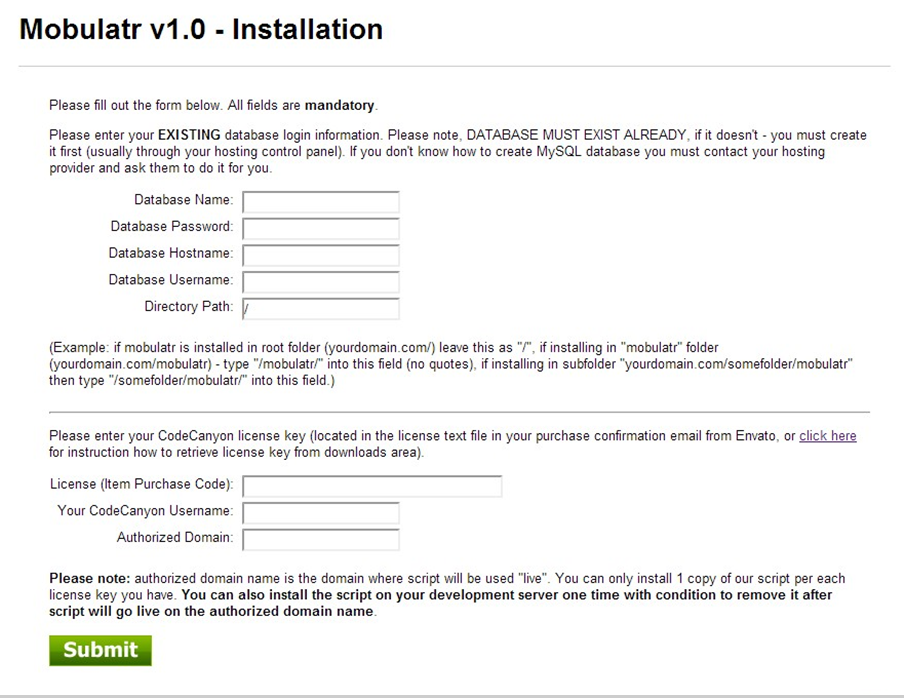
Step 4: Follow on-screen prompts & instructions.
2 important things to note at this step:
– database MUST exist already, script doesn’t create database, it will just use the one which you will allow it to.
– “Directory Path” must reflect the path where you uploaded “mobulatr’ folder, for example if you uploaded it to yoursite.com/mobulatr then directory path must be set to /mobulatr/ (with trailing slash!)
Step 5: After pressing submit – you will see success message on screen if everything went well, together with default admin password and username.
Note: if you will see error messages that some files/folders do not have CHMOD 777 set on them – all you need to do is login to your FTP account using ftp client like filezilla (filezilla- project.org) and then find those files/folders, right mouse click on them and select “Edit Permissions” – then set 777 (select all checkboxes). If you will have any issues with that – you can just provide following list of files which need to be set to 777 to your hosting provider:
1) /mobulatr/admin/includes/
2) /mobulatr/uploads/ (and ALL folders inside it)
3) /mobulatr/admin/log/
4) /mobulatr/cache/
5) /mobulatr/includes/dbconnect.php (this file will be set to restrictive chmod after installation automatically).
Installation complete! You can now go to yoursite.com/mobulatr/admin/ and use default username and password: admin / pass
Note: You should remove install.php after installation or rename it to something like fjkfjsdlfjs.php..
Configuration
Right after the installation – you will need to change admin email in SETTINGS of the product, after login.
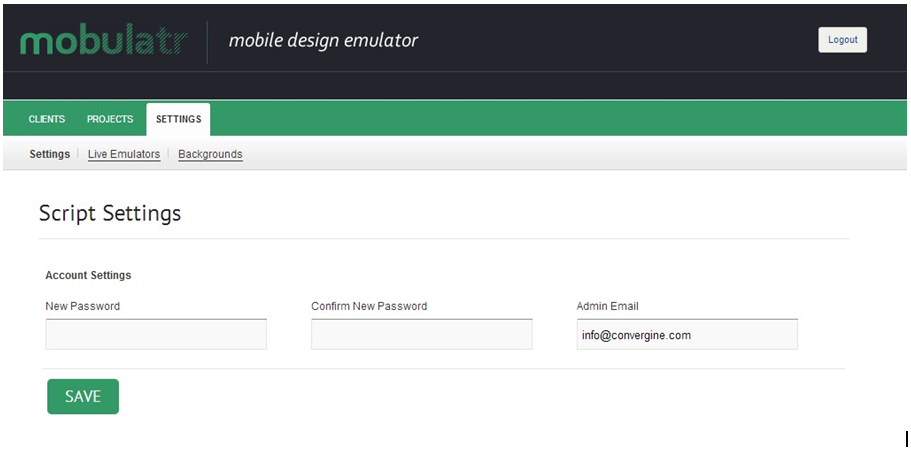
Enter new email address in “ADMIN EMAIL” and click Save.
Also, please change default password to something of your liking.
You will see 2 other sub-menu items in SETTINGS section: “Live Emulators” and “Backgrounds”.
Settings => Live Emulators
This section allows you to add existing mobile site emulators for your client to try their existing site for mobile compatibility. 2 emulators are included by default.
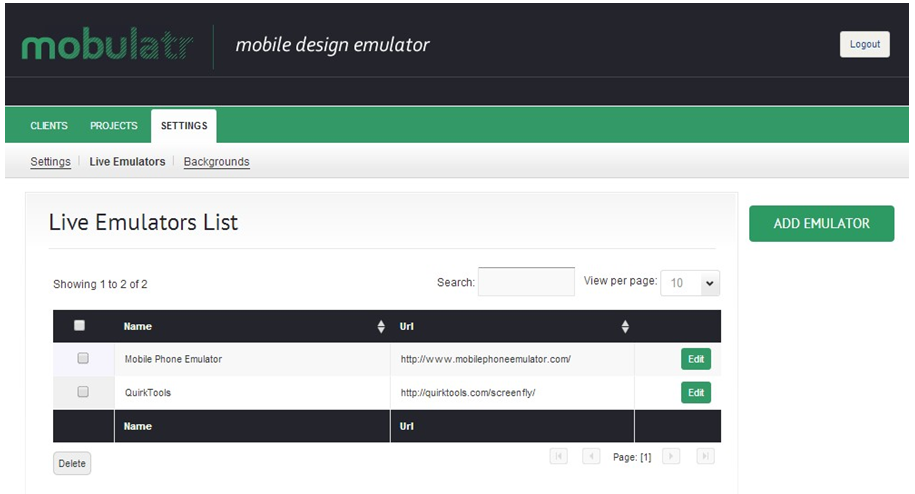
Click “Add Emulator” to add new one, enter emulator title and URL, click save.
Settings => Backgrounds
Here you can create backgrounds “library” for your projects. All backgrounds which you create here will be available for selection when you will be creating project.
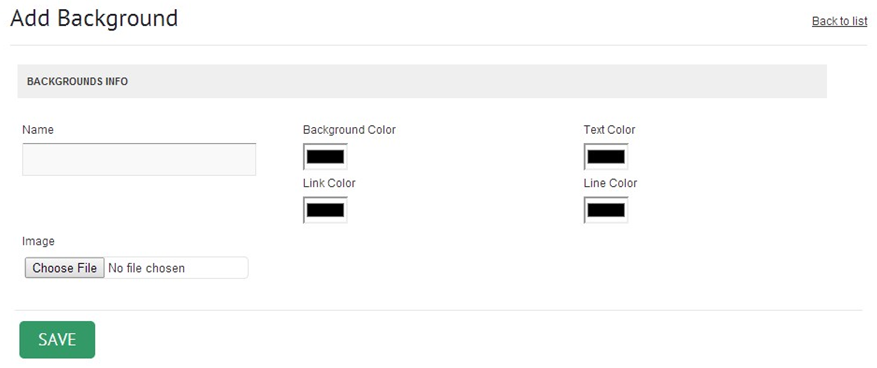
Click “Add Background” to add new one:
Please note – uploaded image will always be priority over the background color.
Clients
Clients is the main section where you should start after configuring settings and backgrounds/
emulators.
In order to create a project and start uploading your mockups and preview – you have to create a client first. There are 6 basic informationn fields when you go to Clients => Add Client
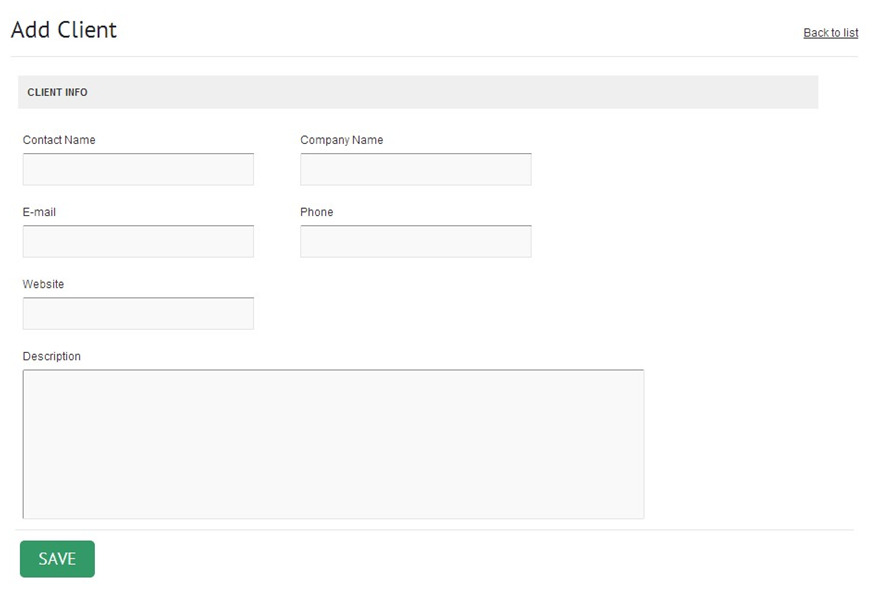
You have to enter at least contact name and company name. When done – press SAVE. Now you can proceed to Projects section, to create a project for this client.
Projects
To start uploading your designs and mockups – you have have create a project and assign it for one of the clients.
Go to projects -> Add Project

Now, when you’ve finished with adding your mockups – click save and go to all projects list – you will see the link and options to share the link with your client (in the table layout.)
Upgrades
If you would like to update to latest version and you’ve already installed Mobulatr, all you need to do is re-upload all the files from downloaded archive from codecanyon, EXCEPT mobulatr/ admin/includes/dbconnect.php
Simply dowload latest version from codecanyon.net, unzip somewhere on your computer, then use FTP software to upload files to your site FTP (pretty much same as when you did initial installation of this software).
Technical Support
We provide courtesy support for all our products to our valued customers within 48-72 hours after receiving the request through our support ticketing system. Each purchase comes with 6 months support time. After that – you may either purchase extended support through the marketplace or purchase premium support with us.
If you need any help regarding the installation of the script or any other question please read through respective product documentation first and if solution is not found – open support ticket (please note, you will need to register account and you will be required to provide your license key (item purchase code) during the registration process, which will then be validated through CodeCanyon API. If your support period has expired you may either extend it with Envato or purchasepremium support from us).
Please note that we do not provide support by email. Any email related to support and not to pre-sales questions will be replied to after any other support tickets are resolved and in general will be directed to open a ticket, since we need to validate your purchase/support period validity.
For more details about our support policy and terms of service (including what is and is not included in Basic Support) click here.
Our business hours are Monday – Friday: 9:00am – 6:00pm (EST), and support is provided only at that time. Upon opening a ticket, we make it our goal to respond within 48-72 hours, however depending on the issue you’re having it may take a bit longer, but in any case we will address the issue within specified period of time with at least “resolution time” in reply.
Changelog
v1.0 – 26 February 2014
initial version released
v1.1 – 10 March 2014
minor bug fix update:
– added “cache” folder chmod checking during install
– added styles for error messages during install
– fixed image previews display in admin projects
– added fix for date_default_timezone_set error message
– fixed css issues with front menu
– fixed admin preview link to properly display if accessed from https
v1.2 – 15 December 2014
minor bug fix update:
– fixed envato API license key validation issue
– fixed forgot password retrieval issue
v1.3 – 1 July 2015
security update:
– updated prettyPhoto library to 3.1.6
Sources, Credits, Appreciation
We’ve used the following images, icons or other files as listed.
– jQuery Library – http://www.jquery.com
– jQuery prettyPhoto – http://www.no-margin-for-errors.com/projects/prettyphoto-jquery-lightbox- clone/
– jQuery Spectrum colorpicker by Brian Grinstead http://bgrins.github.io/spectrum/
– jQuery Colorbox – http://www.jacklmoore.com/colorbox
– jQuery UI Library – http://www.jqueryui.com
– jQuery TipTip by http://www.drewwilson.com
– jQuery DataTables by Allan Jardine http://www.sprymedia.co.uk
Once again, thank you so much for purchasing our product and we hope you will enjoy using it!


