Introduction
BookingWizz is a powerful, easy-to-use booking software that allows website owners to setup events, classes, and programs, and immediately begin taking free or paid reservations online. It is flexible, customizable, and has great management options.
**Note – as a “stand-alone” application, BookingWizz will not integrate with other 3rd party applications like WooCommerce. Although, integration with WordPress – possible through purchase of addon “BookingWizz for WordPress”.
System Requirements
Standalone App
These are the system requirements in order to use BookingWizz. If you are unsure whether your server meets these requirements, contact your hosting company.
1) PHP 5.0+
2) MySQL 5.0+
3) cURL must be enabled in order to install the script
Addons Requirements
For BookingWizz stand-alone – existing MySQL database with proper permissions from database user to connect to this db (in case of new install). If you don’t know your database username/password/host/name – you need to contact your hosting provider.
For BookingWizz for WordPress – you MUST have BookingWizz v5.5+.(either installed already, or just uploaded to the “root” of your domain). If you’re purchasing both the BookingWizz script and the BookingWizz for WordPress addon at the same time, just follow the installation instructions in this manual. However, if you’ve been using BookingWizz for some time and you decide to purchase and install the WordPress addon, please be aware that BookingWizz will be switched from its original database to the new WordPress database, and your bookings and settings will not automatically transfer over to the new database. In this case, there will be two (2) options: You can 1) either manually move all bs_* tables from the standalone database to the new database where your WordPress is installed, or 2) you can change the /booking/includes/dbconnect.php database connection manually to continue using the standalone database instead of the new WordPress database. Of these two, Option #1 is best method.
For BookingWizz Credit Card addon, you will need an SSL for processing credit card transactions, and a Merchant account from one of the supported gateways.
For BookingWizz SMS Reminders addon, you will need an account from one of the supported SMS gateways.
BookingWizz Standalone
Installation
IMPORTANT NOTE: if you have purchased BookingWizz for WordPress addon – you MUST skip BookingWizz standalone installation instructions and follow instructions outlined in the Bookingwizz for WordPress installation section.
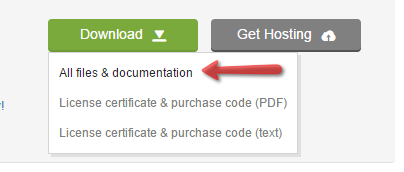
Step 1. Download the archive from codecanyon.net downloads section, by clicking on green download button and selecting “All Files & Documentation”.
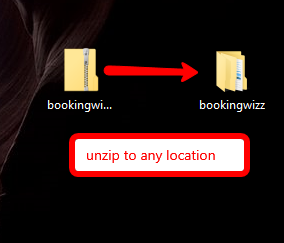
Step 2. Unzip the downloaded archive somewhere on your computer to any location.
Step 3. Download and install FileZilla FTP Client (or use any other FTP client of your preference). There are plenty of tutorials online how to download and install FileZilla – few good examples: SiteGround FileZilla Tutorial, Original tutorial by FileZilla
After Filezilla is setup & launched – connect to your site using your FTP credentials (you must obtain those from your hosting provider).
Step 4. At this point, you should have your FileZilla window open and left part would be showing your computer contents and right part is showing your website FTP.
Navigate in the right window to the root of your site (usually it’s one of these folders, depending on server type: public_html; htdocs; httpdocs; public; html; www; )
You should upload your “bookingwizz” folder which you unzipped in Step 2 to the root folder now. If you’re installing on WordPress site – booking folder must be placed on the same level where you have your wp-content / wp-includes / wp-admin folders (in the root of your WordPress site – see image below). All you need to do is drag and drop the booking folder to the root of your site in the right window. In our case – root of our WordPress site is folder named “public” – and this is where we’re uploading our “booking” folder. 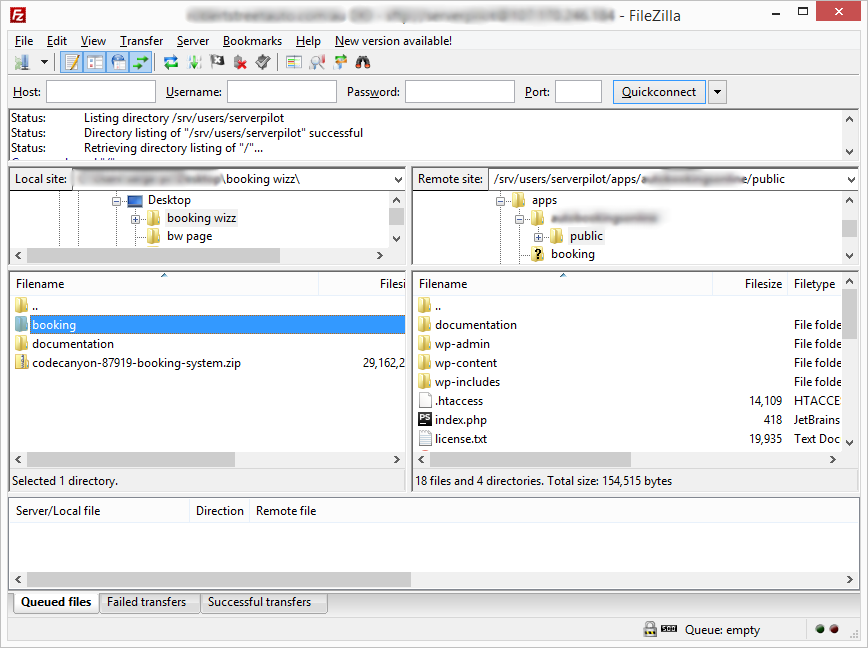 If all done right – you should now be able to access installation page at yoursite.com/booking/install.php
Step 5. Fill out the installation form at yoursite.com/booking/install.php and once completed you can now login at yoursite.com/booking/admin.php using default username “admin” and password “pass”. Do not proceed with installation wizard if you’re installing bookingwizz for WordPress! Instead, follow installation instructions outlined in WordPress plugin installation below.. You will need to use item purchase code for this installation wizard, please read here how to obtain it. 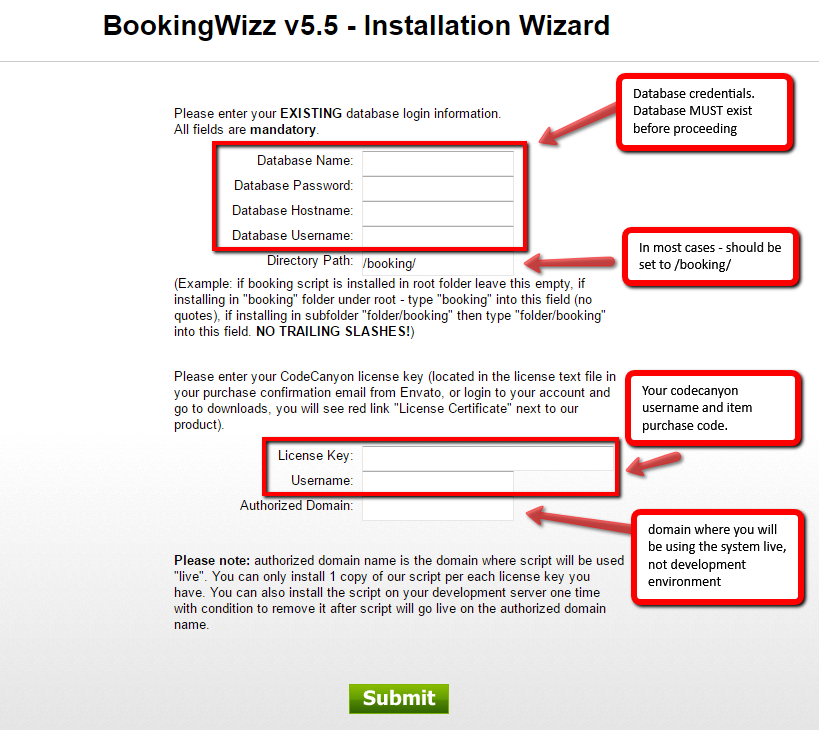
Upgrade
From time to time, it will be necessary to upgrade your BookingWizz application to the latest version.
Here are some important steps to remember as you upgrade:
If you have any version of BookingWizz that is earlier than v5.4, it will not be possible to upgrade it to the latest version. In this case, you would need to do a fresh install, and you would not have the option to import your bookings and settings except by doing so manually, one by one, or by seeking a web developer’s / web masters’s help.
If you have BookingWizz v5.4 or higher and you need to upgrade, begin by doing a backup of your “booking” folder. Go to your FTP and copy “booking” folder from the FTP to your computer, then back up the database which you are using for bookingwizz (please consult with your hosting provider if you don’t know how to backup the database)
Now go to CodeCanyon and download the latest BookingWizz files from your downloads page. Unzip it to a folder on your desktop, find the “bookingwizz” folder, then upload it to your existing booking folder on your site via FTP (explained previously, above) – if prompted whether you want to overwrite existing files -click yes.
The last and very important step in the upgrade is to actually run upgrade wizard by navigating to yourdomain.com/booking/upgrade.php and follow on screen instructions.
Configuration & Settings
This section describes BookingWizz settings. Please note that this is applicable to both, BookingWizz standalone and BookingWizz for WordPress. If you’re new to BookingWizz you should start by going to settings ( Top right corner of the screen -> Admin -> Settings ). When you’ll click on it you will see BookingWizz main script settings. Please review the screenshot below. 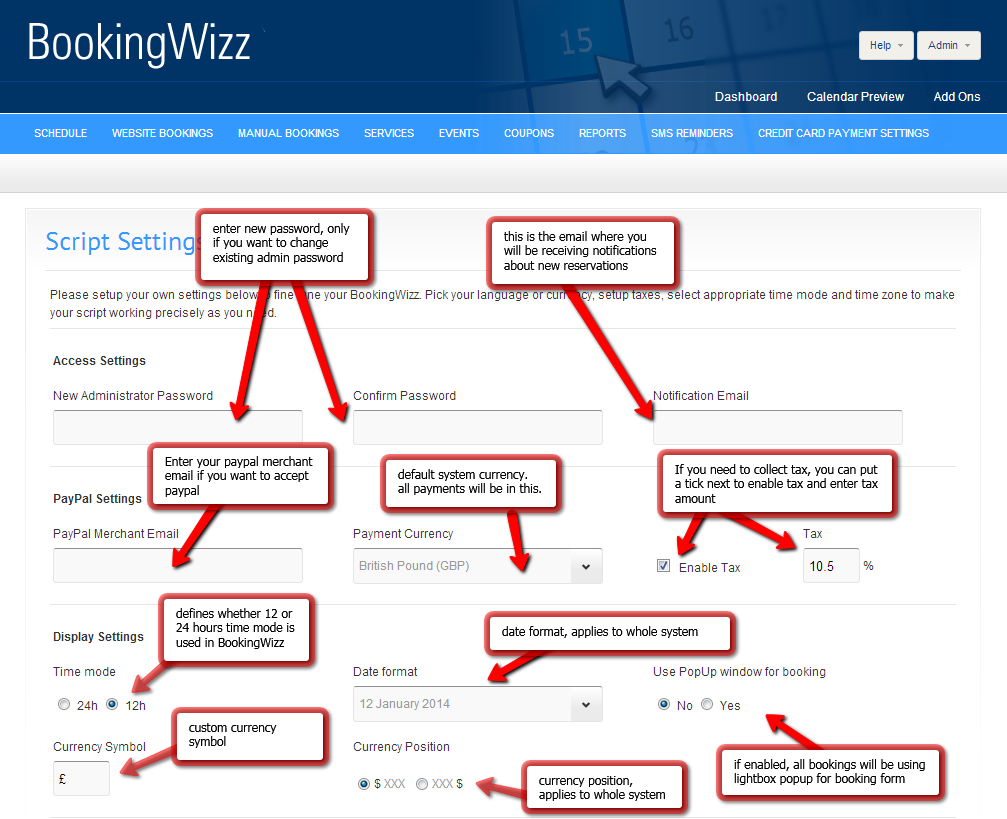
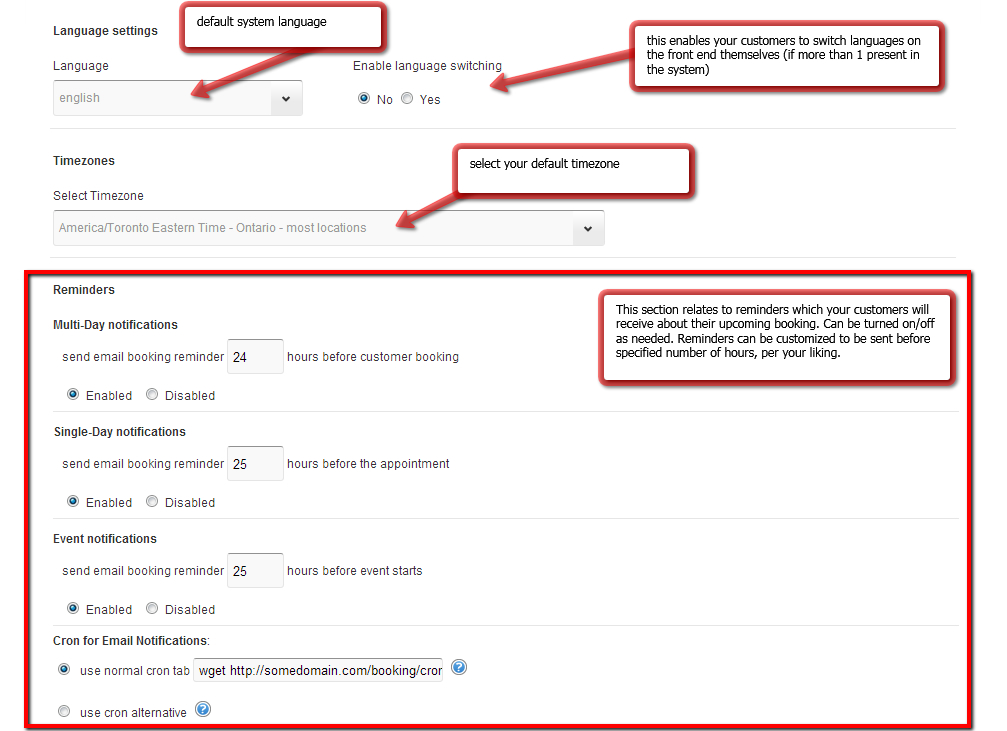
Regarding CRON for email notifications. There are 2 options, the regular cron (scheduled task) or the alternative to cron (similar to the one WordPress uses). We strongly suggest to setup proper cron (normal cron tab), if you’re having hard time setting it up – you should consult with your hosting company, they should be able to assist you with this. You can also read more about setting cron in cPanel here. If you have different control panel (not the cPanel) – please consult you hosting company for proper instructions. If for some reason you cannot use normal cron tab, you need to select cron alternative option. The only downside to this method is that it requires somebody to visit the site to trigger the cron. So, if you don’t visit your BookingWizz application regularly, and you don’t have much visitors, then there is a chance that one or another customer will not receive these notifications. Please also note that if you’re using BookingWizz SMS Reminders plugin – sms triggering also is tied up to the same cron file.
Now, after you’ve done setting up basic settings you need to decide which calendar to use for your business logic. For this, please read Types of Calendars, especially explanations about what is Single Day and what is Multi Day calendars in BookingWizz
BookingWizz WordPress
Installation
When you’re installing bookingwizz for WordPress – there are 2 pre-requisites you have to meet:
1) BookinWizz (original, not wp plugin) must be uploaded to root of your WordPress site and must be accessible at yourwordpressite.com/booking
2) BookingWizz MUST be just uploaded and NOT INSTALLED
If both above requirements are met – you shouldn’t have issues installing BookingWizz for WordPress. Please follow steps below to install bookingwizz for wordpress.
Step 1. Make sure you’ve uploaded “booking” folder as outlined above in standalone bookingwizz installation instructions, and make sure you can access bookingwizz at yourWPsite.com/booking (you should see error: Application Not Installed)
Step 2. Download plugin files from codecanyon same way as you’ve downloaded BookingWizz standalone above.
Step 3. Unzip the downloaded archive somewhere on your computer. Again, it’s done same way as you did for BookingWizz standalone above.
Step 4. Now you need to upload “bookingwizz_wp” folder to your wordpress yoursite/wp-content/plugins/ folder through FTP. Please take a look on the FTP instructions in previous section.
Step 5. After you’ve uploaded bookingwizz_wp to your plugins folder – you should go to wordpress admin, navigate to plugins section and click activate under BookingWizz for WordPress plugin.
Upgrade
**Note – You can only upgrade IF you have BookingWizz v5.3/v5.4 and BookingWizz_wp v1.2 at the moment!
First, do a backup of your current BookingWizz. You can do this by following the procedure outlined in the previous section, or you can follow these directions:
Step 1. Go to your FTP and download your “booking” folder from your root folder to your computer.
Step 2. Perform a database backup through your hosting control panel (go to phpmyadmin to do a backup). If after reading the directions in the previous section you are having trouble working with your FTP files or your PHPMyAdmin, contact your hosting provider for help backing up your site and mysql database.
Step 3. If you purchased BookingWizz v5.5 and Bookingwizz_wp together and you haven’t yet uploaded BookingWizz v5.5 to your FTP yet – please upload the “booking” folder to your site root (as explained in the standalone installation, but WITHOUT actually installing it)
Step 4. Next, before installing Bookingwizz_wp, deactivate your existing bookingwizz_wp plugin via your site’s admin panel
Step 5. Next, go to your FTP, find wp-content/plugins/ folder and remove your existing bookingwizz_wp folder from there. Then upload your new bookingwizz_wp folder from the files you just downloaded from CodeCanyon.
Step 6. Open your browser and navigate to “yourdomain.com/booking/upgrade.php”. Be sure to substitute your actual domain information here.
Step 7. Now go to your site’s admin panel (wp admin panel) and activate your bookingwizz_wp plugin. You should see “BookingWizz” in the left sidebar after activation – click it and you’ll be asked to enter item purchase code to proceed.
Step 8. You will need to enter your original(standalone) Bookingwizz license key and enter the correct BookingWizz location (which is usually /booking/) in the installation wizard after you click “activate” in BookingWizz wordpress plugin.
Add calendar to sidebar via widgets
BookingWizz for wordpress has two (2) widgets at the moment.
1. Calendar widget – can show single calendar (service) which you will select in widget settings (appearance-> widgets) or it can show all calendars (drop down will appear on front end).
2. Upcoming Events widget – at the moment, you can select which calendar events to show (can be all) and how many events to show
To add the Bookingwizz calendar to your Sidebar, scroll to your left sidebar to find and click on “Appearance.” You will see a drop-down menu like the one below. Scroll to “Widgets” on the drop-down bar. 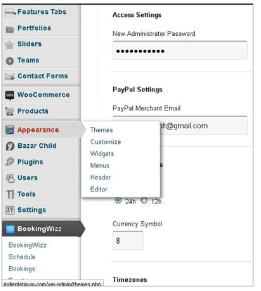 You should arrive at the Widgets page, where you will see your Bookingwizz widgets among the other widgets. In this example, the Bookingwizz widgets are located near the middle.
 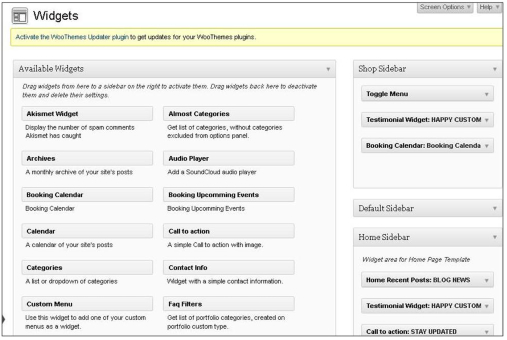 Now we will show you how to add the Bookingwizz calendar to a page. We will use our “Home Page” for an example.
In this image, we are dragging the “Booking Calendar” widget from its place in the middle of the Widget page to the “Home II” sidebar. 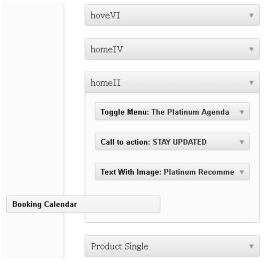 This is how it looks when we drop it in the Home II sidebar:
 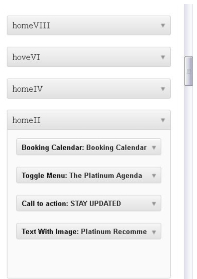 Now when we go back to the Homepage, we see the Calendar Widget in the sidebar:
Add calendar to page/post via shortcode
There are five (5) Shortcodes which are currently available
1. [BW_calendar] – which will display your calendar on any post or page. If there are multiple calendars in the system, this shortcode will display a drop-down in the top right corner so that you can select the needed calendar.
2. [BW_calendar id="calendarID"] – which will display the single calendar (service) of your choice, without any drop-downs. Make sure you change the default CalendarID to the actual ID of the calendar you want. You can get the ID in the list of all services table.
3. [BW_events_list] – which will display all events from all calendars for the current month.
4. [BW_event id="eventID"] – which will display the information and booking button only for a particular event. The event ID can be retrieved from the events list table in the admin panel.
5. [bw_attendees_list eventID="id"] – which will display a list of attendees for a selected event. You will need to add needed styles for “class .bw_attendees_list.” By default, this list is un-styled. The event ID can be retrieved from the events list table in the admin panel.
6. [BW_calendar id=all lang=english] – which will display calendars in a language you choose (English/Spanish/French)
BookingWizz Credit Card Addon
Requirements
These are the system requirements in order to use BookingWizz Credit Card addon. If you are unsure whether your server meets these requirements, contact your hosting provider.
1. PHP 5+
2. MySQL 5.0+
3. cURL
4. BookingWizz v5.5 or above.
5. SSL for live credit card transactions
6. Merchant account from one of the supported gateways:
– PayPal PRO
– Moneris US
– Moneris CA
– InternetSecure
– Elavon
– Authorize.net
– eWay
– PaymentExpress
– Stripe
– FirstData (linkpoint)
– Pin Payments
- – Payeezy
- – Paysafe
- – Mollie
- – 2checkout
Installation
Step 1. download the BookingWizz Credit Card Payments addon from you CodeCanyon account download page and unzip it somewhere on your computer. You should have credit_card_payment folder in the zip file.
Step 2. using FTP program like FileZilla – connect to your hosting account and upload credit_card_payment folder to BookingWizz plugins folder (usually yourdomain.com/booking/plugins/ ).
Step 3. Now open your website’s BookingWizz admin panel, and click on “Add Ons”:
 and turn “on” the required addon
Upgrade
In order to upgrade from older Credit Card BW Plugin you must deactivate current plugin from Addons section first, and then remove credit_card_payment folder from yoursite.com/booking/plugins/ folder. After that is done – please repeat the instructions from the Installation section above – with freshly downloaded files from codecanyon.
BookingWizz SMS Reminders Addon
Installation
Step 1. download the BookingWizz SMS Reminders addon from you CodeCanyon account download page and unzip it somewhere on your computer. You should have sms_reminders folder in the zip file.
Step 2. using FTP program like FileZilla – connect to your hosting account and upload sms_reminders folder to BookingWizz plugins folder (usually yourdomain.com/booking/plugins/ ).
Step 3. Now open your website’s BookingWizz admin panel, and click on “Add Ons”:
 and turn “on” the required addon
IMPORTANT NOTE: You have to setup CRON as outlined in configuration section for BookingWizz. Without setting up the cron – no SMS messages will be sent!
Upgrade
In order to upgrade from older SMS Reminders plugin you must deactivate current plugin from Addons section first, and then remove sms_reminders folder from yoursite.com/booking/plugins/ folder. After that is done – please repeat the instructions from Installation section above – with freshly downloaded files from codecanyon.
General Configuration & Settings
BookingWizz SMS Reminders allow you to send SMS reminders to your customers about their upcoming reservations. Below you will find all the settings and their meaning.
The very first setting which you see on SMS reminders settings page is API access. Depending on which SMS processor you’ve signed up with you need to obtain API access with the help of this manual (read next chapter about this).
Right after API access you will see following settings:
This is the phone number which your customers will see sms coming from.

This is the name which your customers will see as sms from. 
If you want your Multi-day customers receive sms reminder about their upcoming reservation – enter desired number of hours in input box and select “Enabled”. If at any time you need to disable these messages – set to “Disabled”. Input box can contain only full numbers. 
Below you can edit the SMS text which your MULTI-DAY customers will receive, with template variables explained on the right. 
If you want your Single-day customers to receive sms reminder about their upcoming reservation – enter desired number of hours in input box and select “Enabled”. If at any time you need to disable these messages – set to “Disabled”. 
Below you can edit the SMS text which your SINGLE-DAY customers will receive, with template variables explained on the right. 
If you want your event customers receive sms reminder about their upcoming reservation – enter desired number of hours in input box and select “Enabled”. If at any time you need to disable these messages – set to “Disabled”. 
Below you can edit the SMS text which your EVENT customers will receive, with template variables explained on the right. 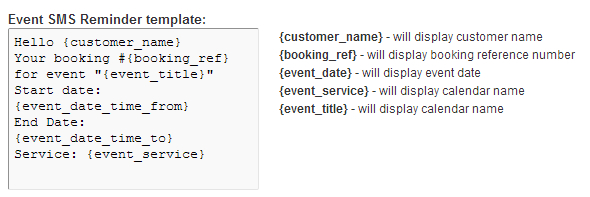
Tropo Configuration
Configuring TROPO SMS gateway is a bit trickier than all others in BookingWizz SMS reminders addon. Here’s a step-by-step guide, what you need to do.
Assuming that you already have registered an account with Tropo:
1. Login to your Tropo.com account
2. Navigate to “Applications” and click “Create New App”
3. Enter any name for the application, select “Scripting API” as type of application, click “New Script”
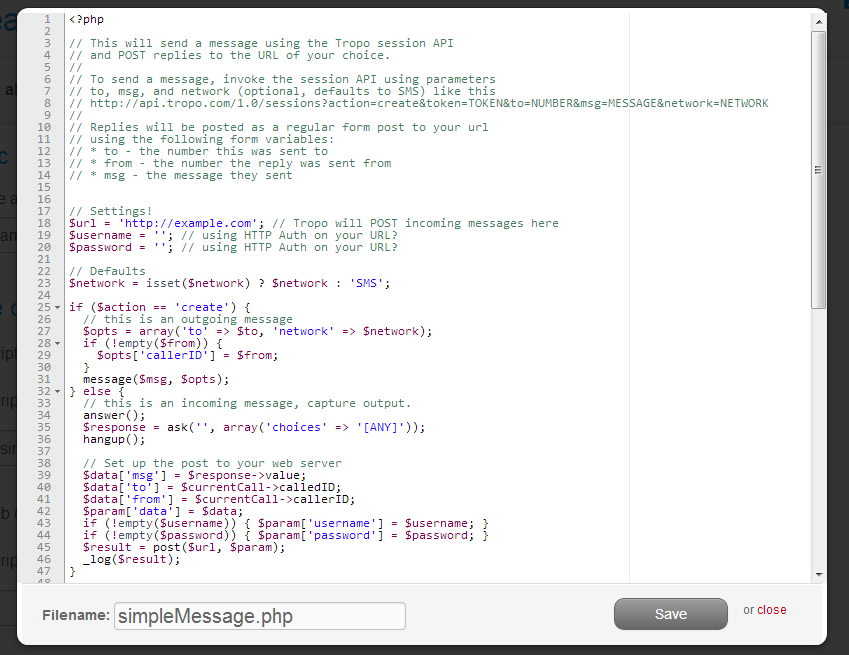
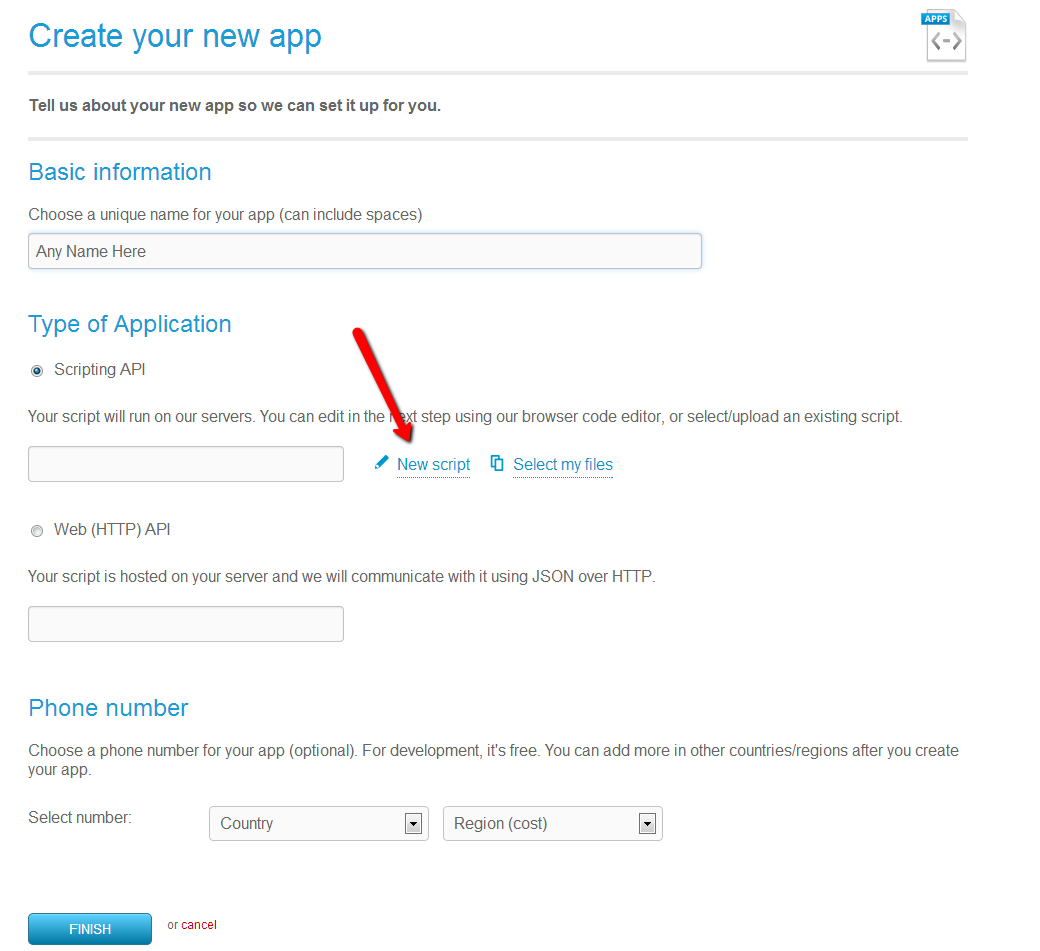 4. In the popup window – type filename “simpleMessage.php” and copy/paste below code into the contents window, and then press “Save”.
 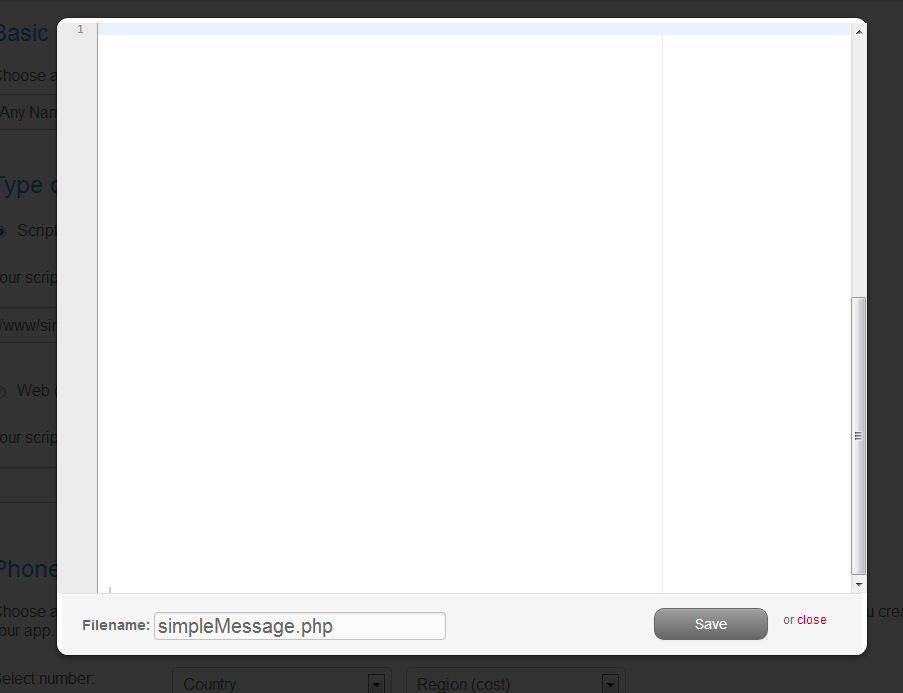 6. It should look like this at the end, before saving:
 7. Select country/region for the phone number and click “Finish”
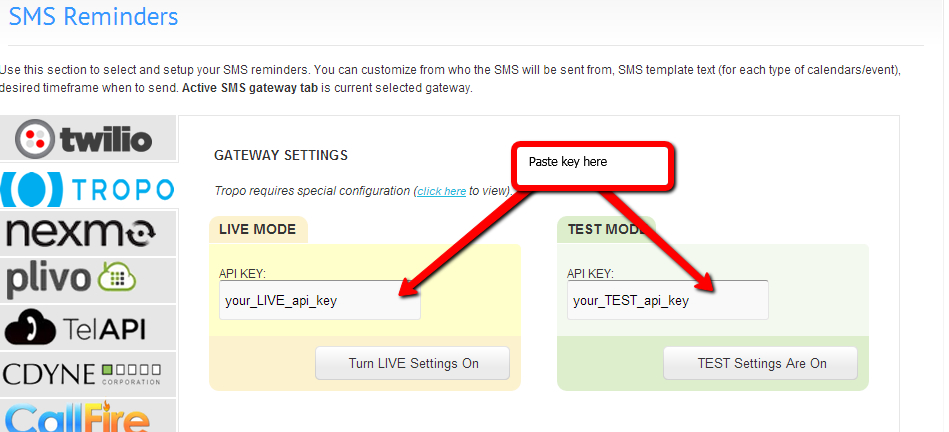
8. You will be taken to “review” screen after this, where on the bottom you will see 2 API keys, one for “voice” and one for “messaging” – you will need to copy the “messaging” API key and insert it into BookingWizz SMS Reminders TROPO settings screen:
 9. You will also need to VERIFY your account by contacting Tropo support (top right menu item on their site). All you need to do is write them that you want to verify your account. In return you will receive a reply from them with 3 requests:
– you will need to provide brief description of your app intended purpose
– you will need to provide them with actual phone number where they can reach you with automated service to provide you a code which you will send to them (to verify that you are indeed you…sort of)
– and you will need to move your account to production with applying minimum of $10 credit.
After all of the above is done – you will be able to test SMS reminders with Tropo. You may also need to switch to production mode by editing your app and clicking on “Production” (see below) 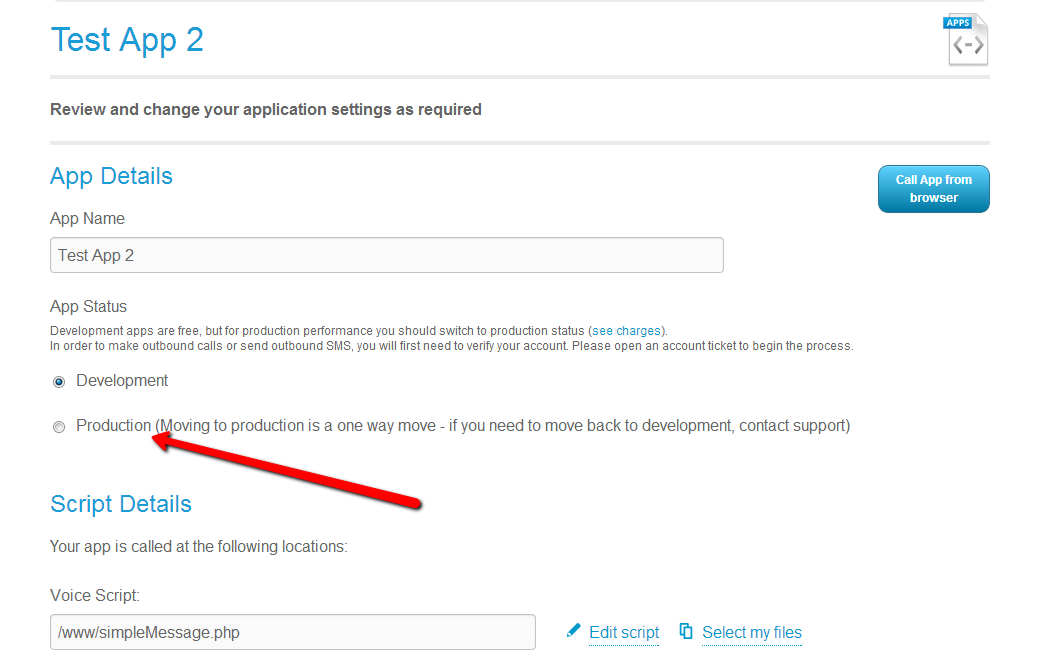
Twilio Configuration
It’s really easy to configure BookingWizz SMS reminders with Twilio account.
All you need to do is register with Twilio, login to your account and go to “account settings”:
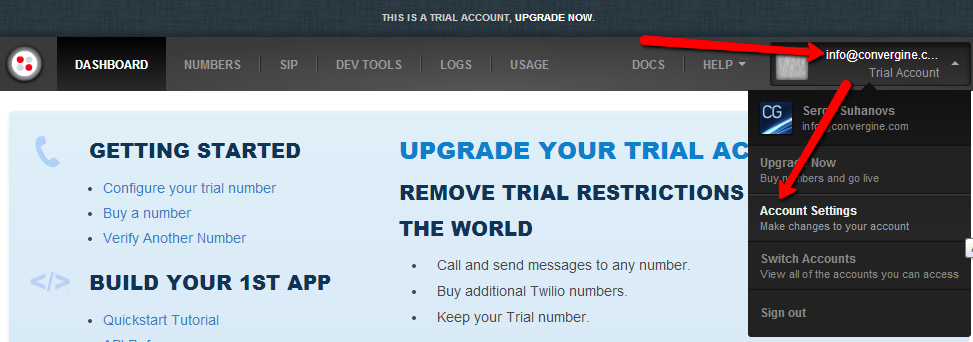 You will see account settings screen with all needed API information
 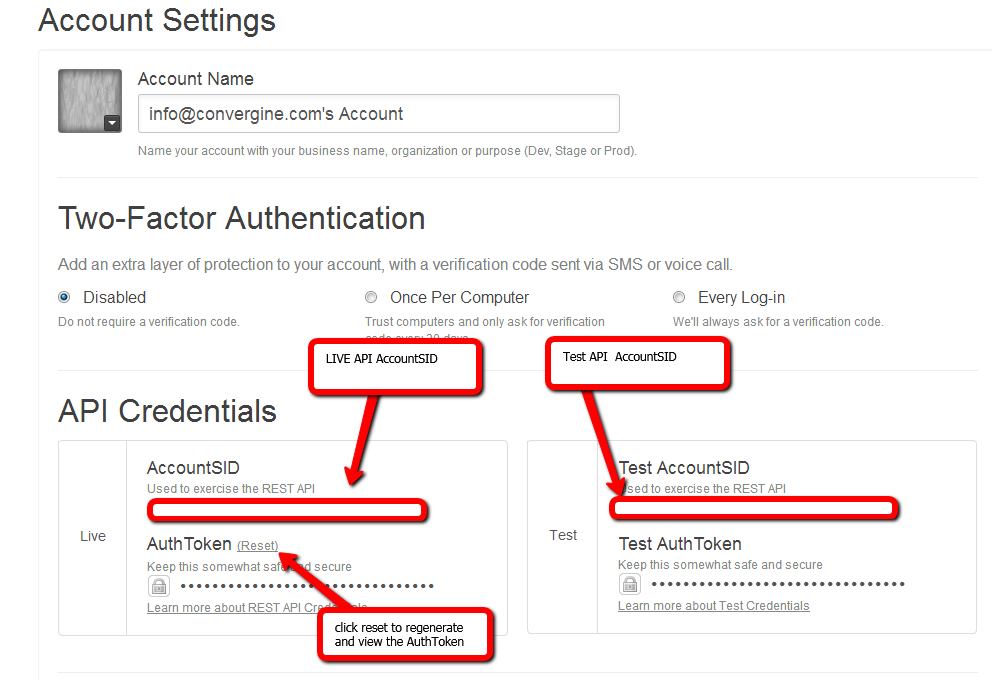 Insert those API credentials in BookingWizz SMS reminders config screen for Twilio and you’re done.
CallFire Configuration
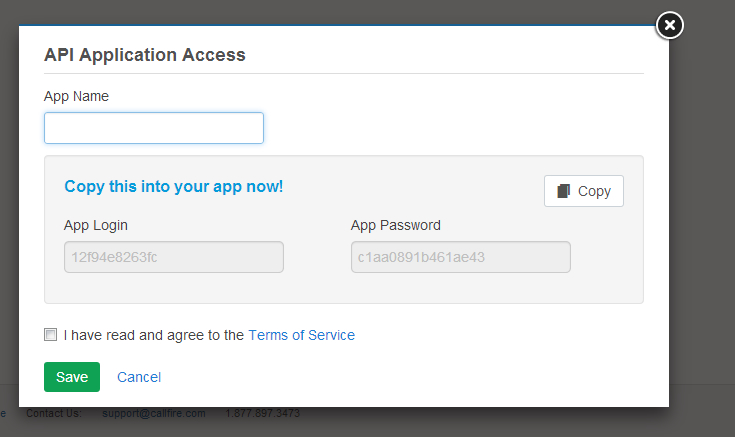
After signing up with CallFire SMS Service, navigate to your account settings, by clicking your name in top right corner. Then click on API Access on the left and find button “ADD API ACCESS”: 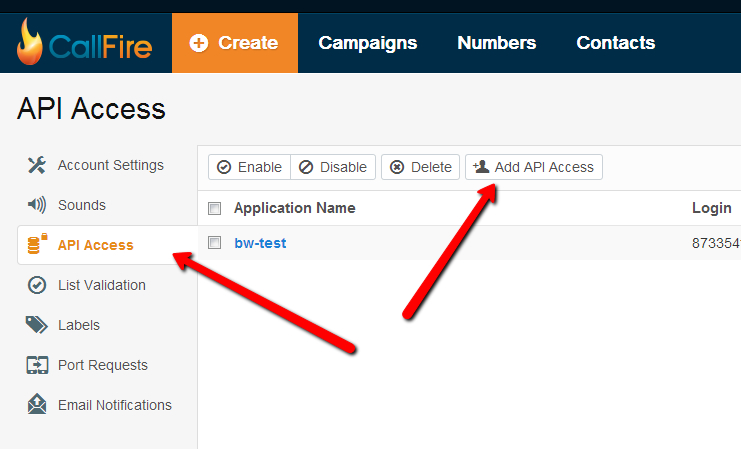 API Application Access popup will appear, all you need to do is enter any name into the App Name and then copy app login and app password from this screen to the BookingWizz SMS reminders CallFire config settings screen.
Nexmo, Plivo, Avaya, CDyne, TextMagic, BulkSMS, CallFire, TextLocal Configuration
To configure “Nexmo”, “Plivo”, “Avaya”, “CDyne”, “TextMagic” BulkSMS, CallFire gateways – all you need to do is register with one of them, login to the account and you will see API access information right on the dashboard or in account settings, which you need to copy/paste into BookingWizz SMS Reminders settings for selected gateway. See below:
Nexmo (dashboard)

Plivo (dashboard)

TelAPI (dashboard)
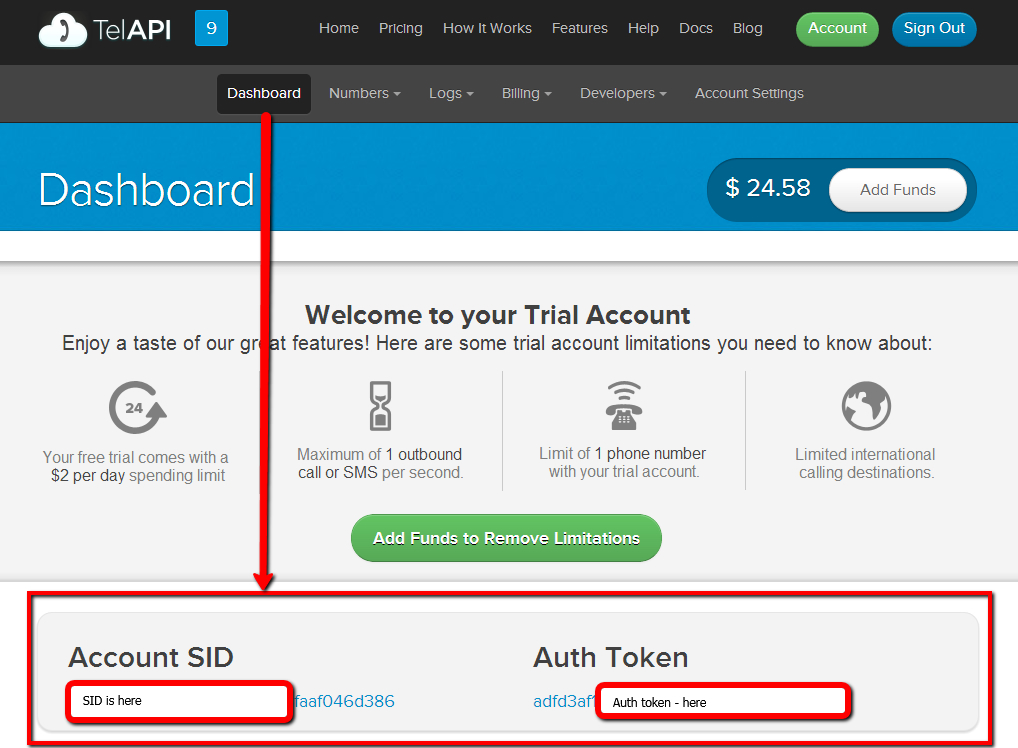
Cdyne
Cdyne will provide you with “License Key” in the email, after you will sign up with them (if you’ll decide to go with them of course). You will need to copy paste that license key to the BookingWizz SMS Reminders settings, just like with any other gateway mentioned above.
TextMagic
API username for TextMagic is your account username (usually your email). Password can be generated using link seen below on the screenshot, or by going to My Services->API->Password 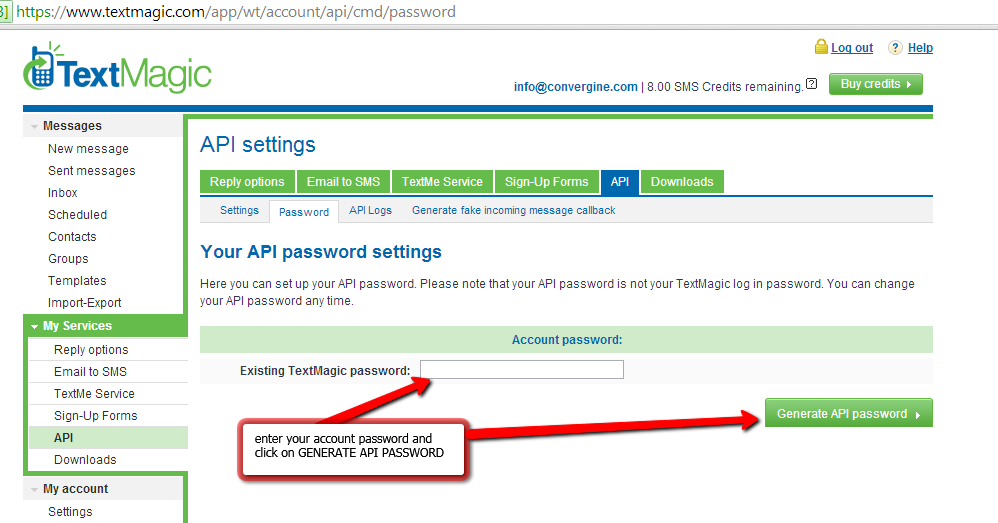
BulkSMS
BulkSMS requires your phone number in main configuration to have code, including plus sign (+14445557788), your API username is your bulksms account username, and API password is your bulksms account password. Also, you need to select the “API_URL” in configuration of BulkSMS SMS reminders section, which depends on where did you register your BulkSMS account. If you registered BulkSMS US account – select US in API_URL, if BulkSMS UK – select UK etc..
TextLocal
API username for TextLocal is your account username which is usually your email. API Password is API HASH which you can find in 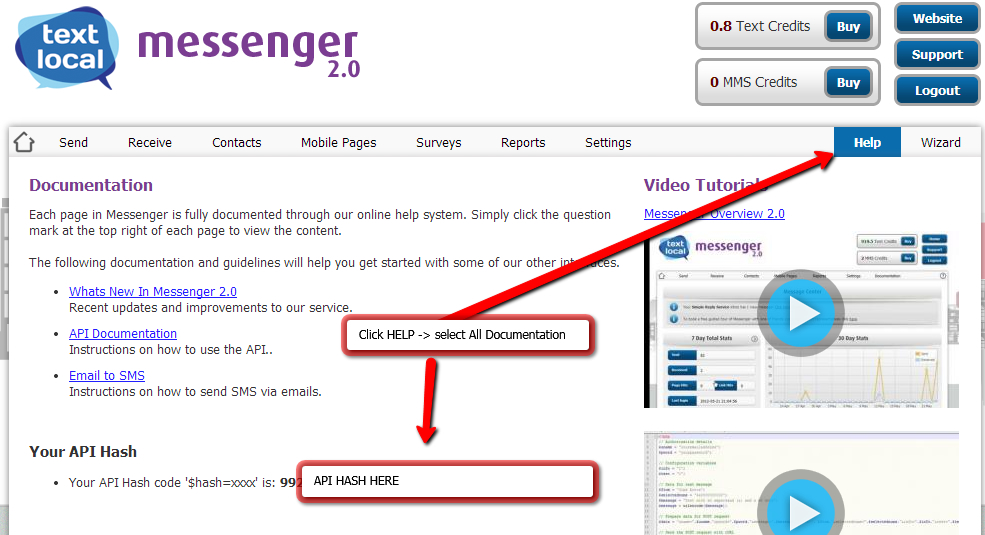
BookingWizz Event Tickets Addon
Installation
Step 1. download the BookingWizz Event Tickets addon from you CodeCanyon account download page and unzip it somewhere on your computer. You should have print_tix folder in the zip file.
Step 2. using FTP program like FileZilla – connect to your hosting account and upload print_tix folder to BookingWizz plugins folder (usually yourdomain.com/booking/plugins/ ).
Step 3. Now open your website’s BookingWizz admin panel, and click on “Add Ons”:
 and turn “on” the required addon
Upgrade
In order to upgrade from older Event Tickets BW Plugin you must deactivate current plugin from Addons section first, and then remove print_tix folder from yoursite.com/booking/plugins/ folder. After that is done – please repeat the instructions from Installation section above – with freshly downloaded files from codecanyon.
Settings
This section describes BookingWizz Event Tickets addon settings. Please note that BookingWizz Event Tickets is an addon for BookingWizz and requires separate purchase.
Before you can attach the ticket template to an event – you will need to create one. To do that, go to PLUGINS menu (on the blue strip) and and click on Event Tickets sub item, once new page loads – click on ADD TICKET orange button.
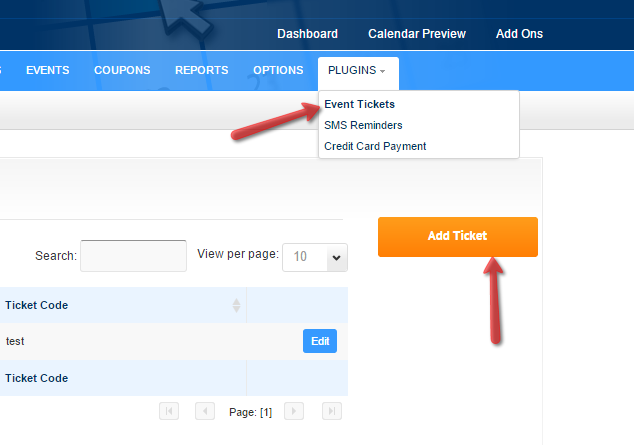
First, start with entering a descriptive name of the ticket template, then define width and height of the printable ticket. Set background color, or upload background image. Save those settings and then you will see much more options/settings below the ticket preview section.
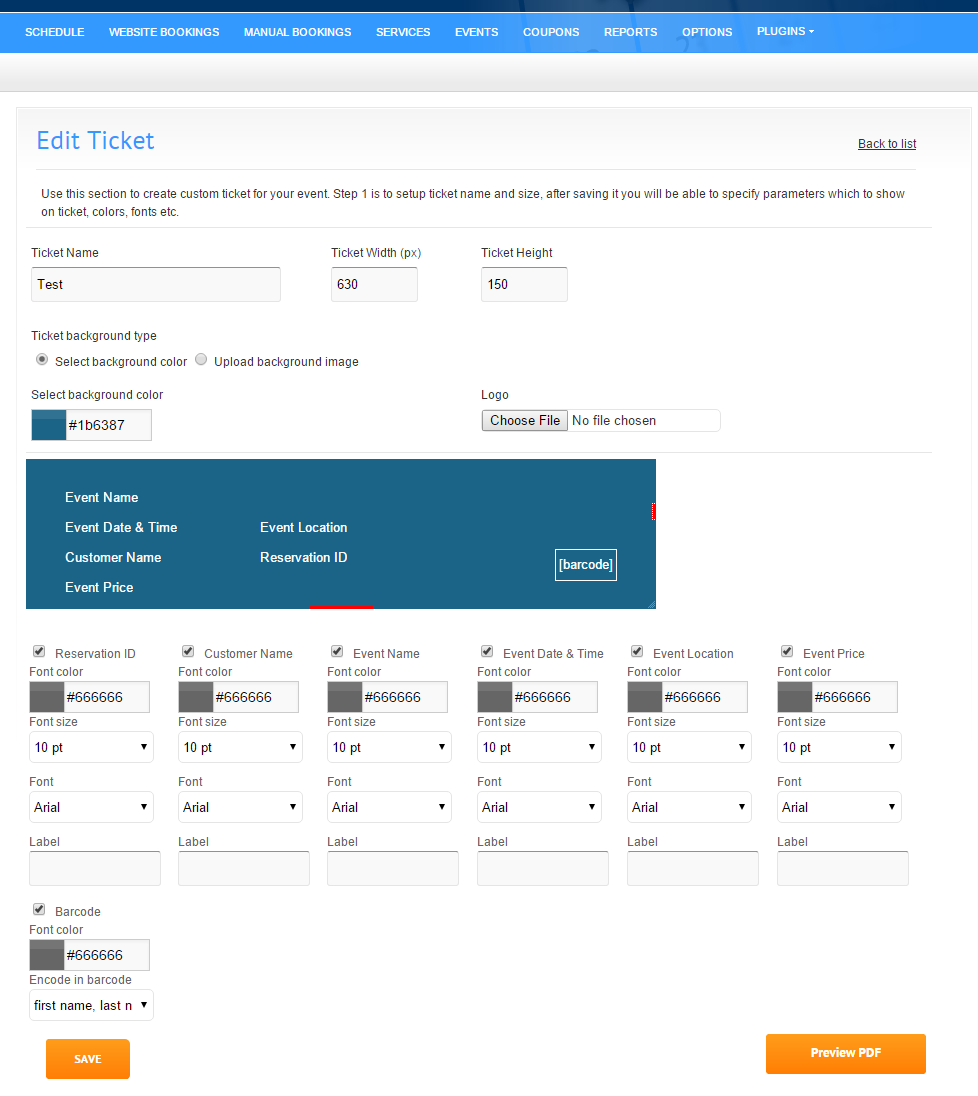
Definitions & How-To’s
Service = Calendar
In Bookingwizz, every service is a separate calendar. So, if you have two services, such as “hair dressing” and “hair coloring”, you will need to create a separate calendar for each. Each service has its own days and times of availability, and there is no option to combine these services on the same calendar at the moment. The customer can easily switch between them.
Types of Calendars
Single Day
A Single-Day calendar allows users to set up a service on specific days, for a specific length of time, as long as it does not exceed 24-hours. The service can be offered once a day or in intervals. For example, if you teach Tennis, you might offer lessons (service) for several hours a day, five days a week, at a charge of $15 per hour. You can set up a multi-user pricing. For example, adults – $15 per hour, children – $8 per hour, family – $30 per hour.
Here is an example of a Single-Day calendar. The service is offered on specific days at specific intervals. For example, the June 15th service date offers 50 available spaces. The number of spaces (bookings) offered on each day is entirely up to you.
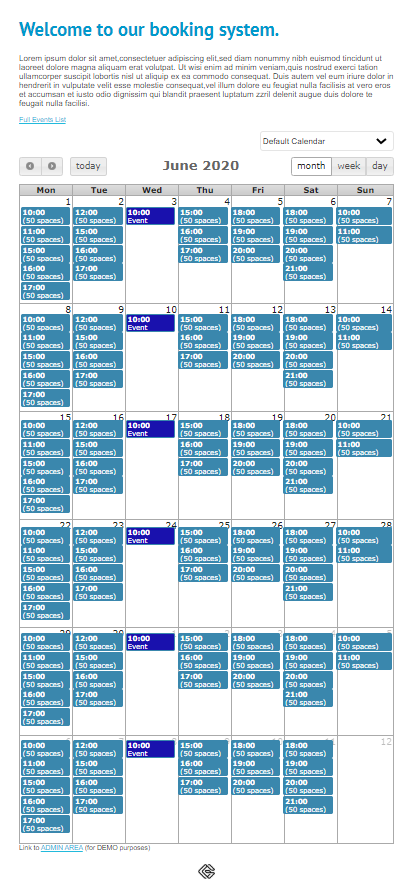 First, a customer decides which date is best for him. In this example, he chooses June 15th, so he clicks on that date and a box opens allowing him to choose his service time:
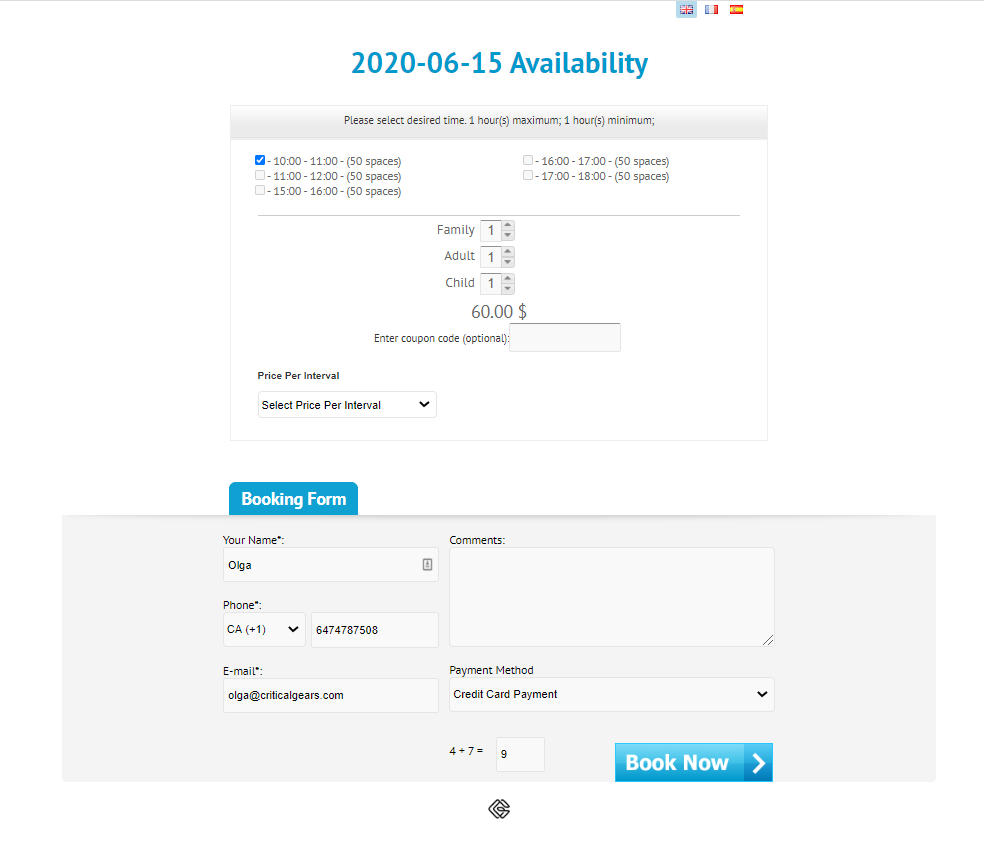
Now he chooses a time slot, and the quantity and price (here, 1 hr. of Tennis for a adult, a child, and 1 family) is automatically calculated. If he decides he wants 2 hrs., he chooses two slots, and as he does, his price changes.
He then fills out the “Booking Form,” clicks “Book Now,” and receives a summary of his booking information, his total ($60), and a payment link.
Please note – You can use “offline payments”, paypal payments standard or you can use the Bookingwizz Credit Card addon (separate purchase) to have a choice of payment gateways for your customers to use.
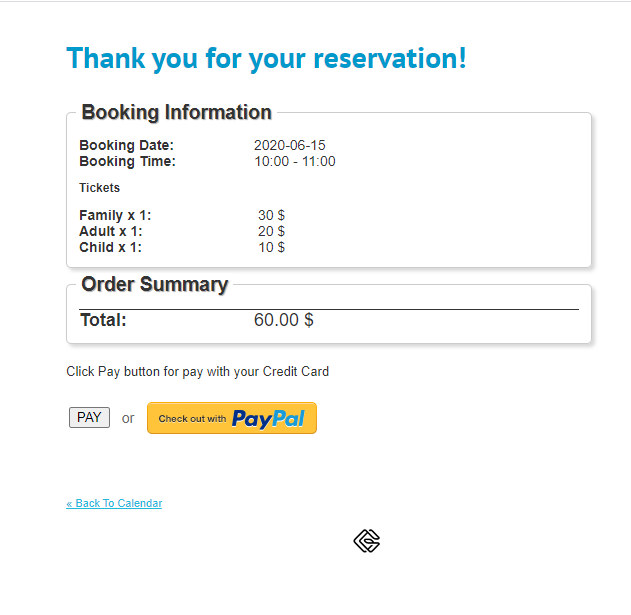
After customer books a slot, he receives a booking confirmation email (you can disable this email in admin area) 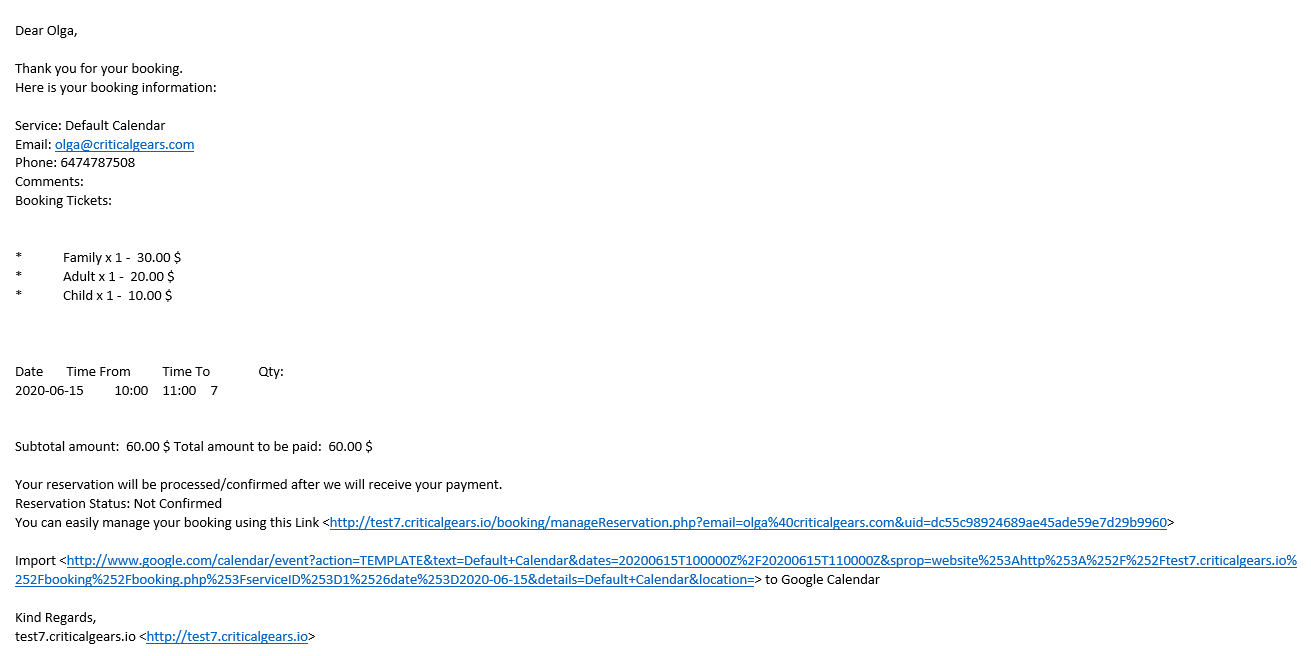
After the customer pays, he receives an email confirmation of his payment and his booking time(s): 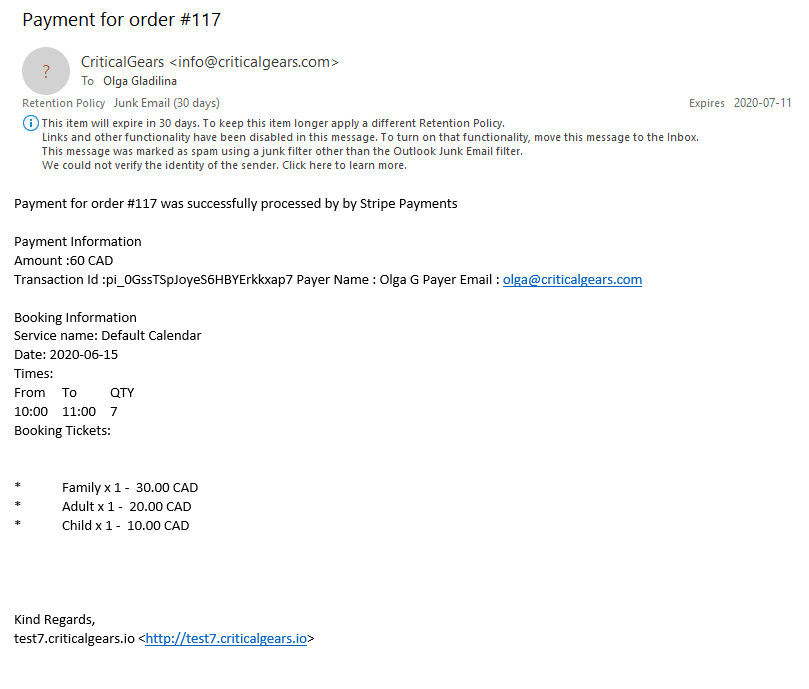 The customer even has the option to add the “times” into his Google calendar or other calendar he uses (iCal, Outlook etc.).
It’s very important to note that if you have to setup schedule (availability) in calendar settings (see image below). We’ve highlighted the most important settings. If you won’t do this – you will see blank calendar without any “selectable” days on it. When you will select the hourly interval and set work hours for at least 1 day a week – you will see “clickable” calendar days in your single day calendar. 
Multi Day
There are many different ways to use the Multi-Day calendar. It is perfect for when customers want to rent an item (like machinery) or a service (like a hotel) for 24 hours or more. Some examples of industries that might make use of this calendar include: Cottage rentals; small hotels; summer houses; bed and breakfasts; and car dealerships. In other words, Bookingwizz is not limited to just the hospitality industry.
In this example, an owner is renting out his guest house from September 12 – 30. Customers can book it for one day at $59 per day, or for multiple days.

Let’s say a customer needs the guest house from September 12 – 19. She would first click on September 12, and this would open the “Availability” screen.
Next, she clicks on the calendar icon on the “From” box. This opens a drop-down calendar, and the customer then clicks on September 12.
She then clicks on the calendar icon on the“To” box. The image below shows how the calendar opens up to allow the customer to choose the beginning and ending date of her rental.
 In our example, the customer books the guest house from September 12 until September 19. Notice how the Bookingwizz program calculates the total cost ($59/night) for the customer:
  Now she completes the “Booking Form” and clicks “Book Now” to be redirected to the following screen. Note that in this instance, she will receive a confirmation only after the Administrator has processed her reservation.
Events
The last main calendar functionality is “Events.” “Events” can be placed on both the single-day and multi-day calendars.
Single-Event Calendar
In the Single-Event calendar below, a Tennis championship has been scheduled. This particular event occurs only one time, on July 31, 2013 at 7:00. The cost is $150, and there are 10 spots left.
To produce this calendar in your wordpress (if using BW with BW for WP addon), you would use the [BW_event id="eventID"] shortcode, which displays the information and booking button for one particular event. The event ID can be retrieved from the events list table in the admin panel.  Multiple-Event Calendar If you are planning an event that will occur more than once, it would be placed on a Multiple-Event calendar. You can produce a Multiple-Event calendar by using the
 [BW_events_list] shortcode, which will display all events from all calendars for the current month.
In the calendar below, the event occurs on two days, September 18 and 25.  In our example, the user chooses to attend the event on September 18, so she clicks on the 18th and the following box opens:
  Note that the event begins on September 18 at 14:00 (2:00pm), ends at 21:00 (9:00pm), and costs $29 per spot. There are 300 spots left. In our example, the user books 2 spots, which totals $58.
After she completes the Booking Form, she receives the following alert:  She then receives confirmation of her booking time and date, and her order total. Then she is given a pay button to click to pay for the booking.
How to: Small Calendar Snippet
It’s really easy to use a small calendar snippet, even if you have a non-wordpress site. All you need to do is simply include “calendar.php” wherever you need your calendar snippet to appear.
Here’s how you would write it: <?php include ("/path/to/booking/calendar.php"); ?>
Please remember: The above path must be changed to YOUR path to the “booking folder/calendar.php” file on YOUR server. Sometimes you may need to include $_SERVER[“DOCUMENT_ROOT”] in the path as well, like this:
<?php include($_SERVER["DOCUMENT_ROOT"]."/path/to/booking/calendar.php"); ?> In fact, it is advisable to first try the path with $_SERVER[“DOCUMENT_ROOT”] rather than actual hardcoded path, since it should work in most setups.
How to: Languages
Beginning with Version 5.1, it is really very easy to translate Bookingwizz to your preferred language. Here’s how to do it:
1. After installing Bookingwizz, navigate to the languages folder inside the “booking” folder.” You will see one file there called: “English.lang.php”
2. Copy this file onto the desktop of your local computer.
3. Rename the file to the language you prefer. For example, you might rename it to: “french.lang.php” or “spanish.lang.php”
NOTE – You would not use quotes. We’re using them here only as an example.
4. Open the new file in any text editor (Notepad, for example), and you will see lots of code which will start with “define(….”
5. Now, all you need to do is translate the second part of each “define” statement, like this:
Before: define("SOME_VAR_HERE", "Welcome to Booking Wizz");
After(French example): define("SOME_VAR_HERE", "Bienvenue a Booking Wizz");
6. After all needed text strings are translated, upload your new file to the languages directory in the “booking” folder.
7. Navigate to your Bookingwizz admin settings page and select your new language in the languages drop-down box. That’s it!
How to: Custom Time Intervals
It’s really easy to add custom time intervals for the booking time – all you need to do is edit 1 file:
Open bs-services-add.php and around line 537 find this:
<select name="interval" class="select" onchange="updateDuration(this)">

<option value="15" <?php echo $interval == "15" ? "selected" : "" ?> rel="<?php echo MIN15 ?>"><?php echo MIN15 ?></option>

<option value="30" <?php echo $interval == "30" ? "selected" : "" ?> rel="<?php echo MIN30 ?>"><?php echo MIN30 ?></option>

<option value="45" <?php echo $interval == "45" ? "selected" : "" ?> rel="<?php echo MIN45 ?>"><?php echo MIN45 ?></option>

<option value="60" <?php echo $interval == "60" ? "selected" : "" ?> rel="<?php echo H1 ?>"><?php echo H1 ?></option>

<option value="120" <?php echo $interval == "120" ? "selected" : "" ?> rel="<?php echo H2 ?>"><?php echo H2 ?></option>

<option value="180" <?php echo $interval == "180" ? "selected" : "" ?> rel="<?php echo H3 ?>"><?php echo H3 ?></option>

<option value="240" <?php echo $interval == "240" ? "selected" : "" ?> rel="<?php echo H4 ?>"><?php echo H4 ?></option>

<option value="300" <?php echo $interval == "300" ? "selected" : "" ?> rel="<?php echo H5 ?>"><?php echo H5 ?></option>

<option value="360" <?php echo $interval == "360" ? "selected" : "" ?> rel="<?php echo H6 ?>"><?php echo H6 ?></option>

<option value="420" <?php echo $interval == "420" ? "selected" : "" ?> rel="<?php echo H7 ?>"><?php echo H7 ?></option>

<option value="480" <?php echo $interval == "480" ? "selected" : "" ?> rel="<?php echo H8 ?>"><?php echo H8 ?></option>

<option value="540" <?php echo $interval == "540" ? "selected" : "" ?> rel="<?php echo H9 ?>"><?php echo H9 ?></option>

<option value="600" <?php echo $interval == "600" ? "selected" : "" ?> rel="<?php echo H10 ?>"><?php echo H10 ?></option>

<option value="660" <?php echo $interval == "660" ? "selected" : "" ?> rel="<?php echo H11 ?>"><?php echo H11 ?></option>

<option value="720" <?php echo $interval == "720" ? "selected" : "" ?> rel="<?php echo H12 ?>"><?php echo H12 ?></option>

</select>
Basically you can add any amount of minutes, however the above ones were tested by us and working properly.
All you need to do for a 90 minute interval is add to the above code: <option value="90" <?php echo $interval == "90" ? "selected" : "" ?> rel="90">90 Minutes</option>
Then save, and upload to the FTP in /booking/ directory, overwriting existing file.
Layout & Design Related
Customize calendar look’n’feel
All BookingWizz styles can be edited in bs-admin.css stylesheet, however if you’re having hard time locationg one or another element we suggest to use firebug or chrome developer toolbar to locate the needed style (please see below).
Some jobs seem bigger than they really are. You don’t necessarily need to hire a coder to make CSS or Styling customization to your Bookingwizz calendar. You can handle some of the smaller customizations yourself.
Like many developers, we suggest that you do your styling through Firebug.
 What is Firebug? It’s a plugin made specifically for your web browser that gives you access to web development tools that allow you to preview LIVE changes to your website and find the file where one or another style is located. You’ll have the opportunity to preview your css changes on the spot, debug it, and/or monitor your site’s CSS, HTML, and JavaScript files. You’ll also be able to find errors quickly and adjust your site to fit your needs. Here’s the link: http://getfirebug.com/ (You can also use Chrome for the same purpose, just press F12 on your keyboard to bring up the web developer toolbar.)
Changing calendar colors, appearance, padding and sizing:
Whenever you need to change something in BookingWizz design-wise and you are not sure where to change it use Firefox or Chrome and apply following methods:
1) right click on the element which you want to edit (see below)
 2) inspect the information firebug (or chrome web developer toolbar) provides you
Adjusting width of the popup form
The following directions for adjusting the width of the popup booking form can be found at this link location:
http://support.convergine.com/topic/how-to-adjust-width-of-the-popup-lightbox#post-106
Open Index.php and scroll down to the bottom of the code. You will see two (2) javascript functions (you’ll see the ‘px’ there), and that’s where you can change width. This will adjust the lightbox itself:
Change 1056px to needed width.
If you need to adjust the form width INSIDE the lightbox:
– Open css/style.css
– Edit width for class .book_form
You may also want to open either Event-booking.php or Booking.php and find following line:
<div class="book_form"><table width="650" class="booking_form">
Change 650 to needed width (that’s the width of the form itself).
Modify booking form fields
It is possible to modify your booking form by adding and removing fields. To do this, you will need to edit the code in Booking.php + Booking.processing.php. Booking.php is the form itself, and Booking.processing.php is the file which processes form submissions as well as sends emails to the administrator and the customer, and inserts records into database.
If you need to edit multi-day booking form – you will have to work with booking-days.php and booking-days.processing.php.
For events booking form – event-booking.php and booking.event.processing.php
At the moment, we do not provide detailed guide on this, however, if you have general PHP knowledge – you should be able to do it, with a little help from a basic description located on the links below:
http://support.criticalgears.io/topic/adding-fields-1
http://support.criticalgears.io/topic/form-fields
Changelogs, FAQs, Support
Changelogs
Bookingwizz Changelog
Bookingwizz Credit Card Payments Addon Changelog
Bookingwizz for WordPress Addon Changelog
Bookingwizz SMS Reminders Addon Changelog
FAQ & Common Errors
You can find all the frequently asked questions and common errors/solutions for bookingwizz in this section
Technical Support
We provide courtesy support for all our products to our valued customers within 48-72 hours after receiving the request through our support ticketing system. Each purchase comes with 6 months support time. After that – you may either purchase extended support through the marketplace or purchase premium support with us.
If you need any help regarding the installation of the script or any other question please read through respective product documentation first and if solution is not found – open support ticket (please note, you will need to register account and you will be required to provide your license key (item purchase code) during the registration process, which will then be validated through CodeCanyon API. If your support period has expired you may either extend it with Envato or purchase premium support from us).
Please note that we do not provide support by email. Any email related to support and not to pre-sales questions will be replied to after any other support tickets are resolved and in general will be directed to open a ticket, since we need to validate your purchase/support period validity.
For more details about our support policy and terms of service (including what is and is not included in Basic Support) click here.
Our business hours are Monday – Friday: 9:00am – 6:00pm (EST), and support is provided only at that time. Upon opening a ticket, we make it our goal to respond within 48-72 hours, however depending on the issue you’re having it may take a bit longer, but in any case we will address the issue within specified period of time with at least “resolution time” in reply.
Request Modifications
We are happy to assist you with any custom development or custom design, whether it is related to our products or not.
Our standard hourly rate is $100 USD per hour.
Custom development quotations are provided only through e-mail. You can send your technical description to [email protected] or fill out the Contact Form.
We will reply with a quote within 2 business days.
Feature Suggestions
We are always happy to hear your ideas, and have setup a support forum where all our registered buyers can suggest features for the next product update. Simply click here and fill out the form.
Sources, Credits, Appreciation
We would like to thank Rita Hubbard, who helped us a lot in creation of this manual initial version.
We’ve used the following images, icons or other files as listed.
– “48px web icons” by Manuel Lopez
– jQuery UI Library
– jQuery Library
– jQuery Colorbox
– jQuery tipTip by Drew Wilson
– jQuery selectbox plugin – by brainfault
– jQuery DataTables plugin – by Allan Jardine/
– jQuery FLOT plugin – by IOLA and Ole Laursen
– jQuery colorpicker by Abeautifulsite
Once again, thank you so much for purchasing our product and we hope you will enjoy using it!


