Overview
Advanced File Management is simple and intuitive file exchange portal which allows you to easily upload, share & manage files for you, your users or your clients.
FTP Synchronization
Upload through FTP, click a button in admin panel, files will be imported into file manager and available for you to manage. Synchronization works both ways, if you’ll delete files from FTP and run the sync again — files will be removed from file management.
Upload & Manage
You can upload multiple files at once and you can drag & drop files into uploader. Manage your files — view, rename and delete them with ease. Sorting and searching included!
Folders & Sub-Folders
Easily manage folders and sub-folders within admin panel.
File & Directory Sharing
Share files individually, or share the whole folder with it’s contents.
User Registrations
You can enable or disable user registrations at any time. Define default settings for new user registrations like upload limits, file extensions, upload directories, whether to create new (home) directory for each user or not.
Roles & Permissions
Admin manages users and their permissions, allowed extensions, upload limits and several other settings including requirement to be logged in to download or not.
Media Preview
Music preview, video preview, HTML/TXT and images viewers — many formats supported.
File Messages
Everyone can leave message for the file, if file is within their permissions. Gravatar integrated.
Logs & Stats
Both administrator and user can see file upload/download statistics, with exception that user sees only his stats. We’ve added logs section for administrator with system usage details.
Notifications
Manage notifications which are sent upon file deletion, file editing, file upload. Notifications are sent using php mail(), sendmail or SMTP — all configurable through admin panel.
Backup & Restore
Backup or restore database at any time through admin panel
Installation Wizard
Thanks to installation wizard you can install the system in less than 2 minutes.
Server Requirements
These are the system requirements in order to use Advanced File Management. If you are unsure whether your server meets these requirements, contact your hosting company.
– PHP 5.x
– MySQL database
– CURL extension must be enabled on the server
*Note: local “home grown” servers are not guaranteed to run our software without issues, as in most cases local servers are not configured as your average server hosted by professional hosting company. Support for local servers is very limited and in most cases buyers are requested to install the software on actual hosting account instead of local server.
Installation
Installing AFM3 is very easy – it all comes down to uploading files to FTP and then navigating to yoursite.com/filemanager/install.php in your browser.
Step 1: Download ZIP archive from CodeCanyon.net containing latest filemanager (AFM3)
Step 2: Unzip the files to your computer. You will see folder filemanager inside.
Step 3: Upload filemanager folder to your site FTP.
There are plenty of video tutorials available on how to upload files to FTP. We recommend using FileZilla (filezilla-project.org) for any FTP ploads/downloads.
Here’s the link to 3rd party youtube videos explaining how to upload files to your site using FileZilla.
To be able to upload files to your FTP – you must know following parameters:
FTP Host
FTP Username
FTP Password
You can get these credentials from your webmaster or hosting provider.
Following tutorial deals only with uploading AFM3 through FileZilla FTP client ( filezilla-project.org ):
- Click the “File” menu and then “Site Manager” item on that menu. A dialog box will appear.
- Click the “New Site” button on that dialog box. This creates a new item under “My Sites” called “New site”. Rename “New site” to the name of your site if you wish. By default, the keyboard cursor would have been placed in the name portion of “New site” allowing you to change the name immediately. If you have lost the cursor because you accidentally clicked somewhere else in the dialog box, you can get it back by simply clicking once on the name. Note that this name can be anything you wish – it is not required for accessing your site. However, you will probably make your life easier if you change the name to that of your site rather than the cryptic “New site”.
- Under the tab “General”, enter the name of your FTP server in the “Host” input box. For example, if your web host told you that your FTP hostname is “ftp.example.com”, enter “ftp.example.com” into the space provided.
- Leave the “Port” and the “Servertype” entry boxes alone. Use your mouse and select “Normal” from the drop down list box for “Logontype”. This will enable the “User” and “Password” boxes for the next step.
- Enter your user id or your login name (or whatever your web host calls it) into the “User” input box. Likewise, enter your password into the “Password” input box. Note that this information is automatically saved onto your computer and will be re-used the next time you run FileZilla, so you do not have to re-enter them again. (It also means that you should not use FileZilla in this way on computers that others may have access to, such as those found in an Internet cafe or a public library.)
- Click the “Connect” button. FileZilla will proceed to log you into your server. If it is successful, you will see a directory listing of your website’s account in the right hand side of the FileZilla window. The left hand side of the FileZilla window shows the directories and files on your own computer.
- If your web host told you to only upload in a specific subdirectory on the web server, such as in the “www” or “public_html” directory, change to that directory by doubleclicking its name in the folder portion of the right window pane (the “Remote Site” window pane). FileZilla will open that folder and show you its contents in the files portion of the Remote Site window pane. Next, locate the filemanager folder in the left window pane (the “Local Site” pane). Both window panes behave mostly like a Windows Explorer windows, so navigating them should not be unduly hard. Once you have located the folder, click and hold your left mouse button – and drag the folder into the right window pane “Local Site”.
- The last step is to verify that you’ve uploaded filemanager folder to the proper location. You should be able to open filemanager installation wizard by going to yoursite.com/filemanager/install.php
Step 4: Once files are uploaded to FTP – please navigate to yoursite.com/filemanager/install.php and follow on screen prompts (you have to replace yoursite.com with your actual domain name).
IMPORTANT NOTE: The MySQL database HAS TO BE CREATED BEFORE completing installation on install.php wizard – as AFM cannot create database for you – it can only populate database which you specify during installation with needed tables for it to operate properly. If you don’t know how to create database – please consult with your hosting provider. Here are some helpful video tutorials on how to create mysql database/user through cpanel (if you have cpanel).
Once installation wizard is complete – please remove files install.php and upgrade.php from your FTP.
You can now access AFM at yoursite.com/filemanager/
Upgrade
In short – you will need to copy database login credentials FROM your v2.0 dbconnect.php file TO the new v3.0 dbconnect.php file, and then upload all files to FTP.
Here are the steps which you need to do in order to upgrade from v2.0 to latest v3.0:
We recommend doing full backup of both ftp files and mysql database before attempting to upgrade from v2.0 to v3.0 (3rd party video for FTP backup, MySQL video)
1) Download new files from CodeCanyon.net
2) Unzip the files to your computer. You will see folder filemanager inside.
3) Go to filemenager/includes/ folder and open dbconnect.php file inside that folder with any text/code editor or your choice.
4) Now, you need to view/copy some variables from the same file from your current filemanager v2.0 as per below.
There are 2 ways to do it:
Option #1
you can download dbconnect.php file from your site using FTP program like Filezilla (filezilla- project.org)
- download filezilla from filezilla-project.org if you haven’t installed it previously (how to install filezilla)
- once installed (or if you’re using different program) – set it up to connect to your site (here’s plenty of youtube videos on how to do it)
- connect to your site and download dbconnect.php from filemanager/includes/ folder to your computer.
Option #2 (if hosting is cPanel based)
Use “File Manager” in your hosting account to view dbconnect.php file online.
If you have Cpanel on the hosting account – here are some good guides on how to use cpanel’s filemanager ( link1, link2)
5) Once you open the dbconnect.php from v2.0 with any text/code editor (either using Option1 or
Option2) you need to copy following variables from it to the NEW dbconnect.php (step 3 above):
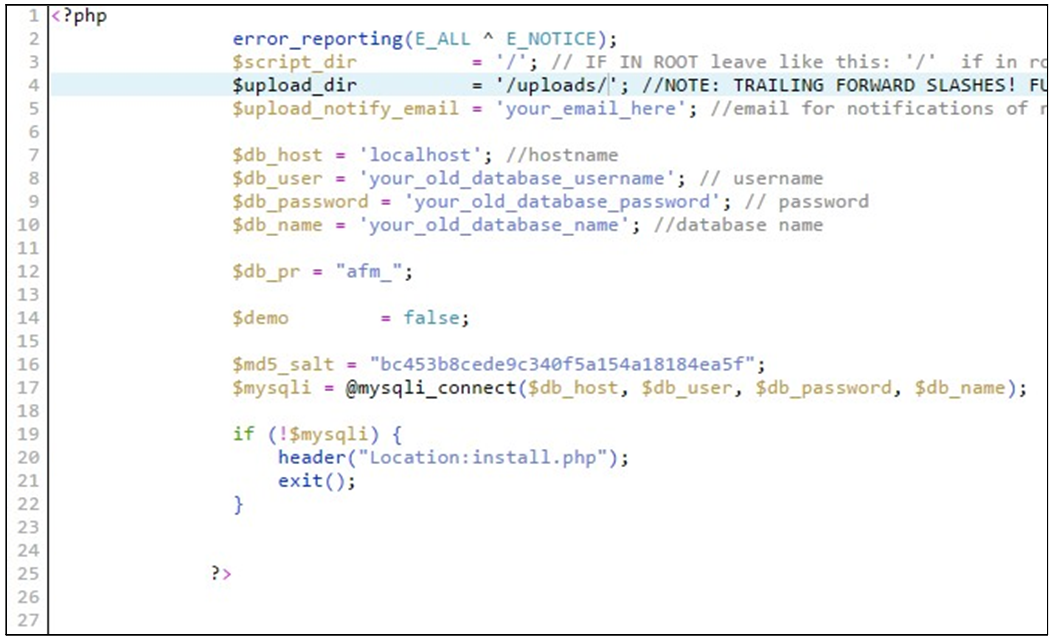
$script_dir, $upload_dir, $db_host, $db_user, $db_password, $db_name
Your new dbconnect.php should look like this now;
(the actual $script_dir and $upload_dir values and $upload_notify_email – most likely will look different, as you’re copying them from your old v2.0!!!)

6) Once copied – save new dbconnect.php.
Now you’re ready to upload ALL files from filemanager folder you unzipped in step 2 to your current filemanager folder on your site.
If using FileZilla – just drag and drop all the files/folders from filemanager folder on your computer (unzipped in step 2) to your site, in the same filemanager folder where your current AFM is installed.
You will be prompted if you are sure you would like to overwrite the files – click Yes to all
(assuming you made a backup, as we suggested before).
7) Once all the files are uploaded – navigate to http://www.yoursite.com/filemanager/upgrade.php
(you have to change yoursite.com to your actual site!!!)
You will see further instructions on screen, just follow those instructions to finalize database update for v3.0
After all above steps done (including database update through upgrade.php file) – please remove upgrade.php and install.php files from your filemanager folder on your FTP.
Configuration
Right after the installation – you will need to configure your Advanced File Management by clicking “Settings” in main navigation after you login.
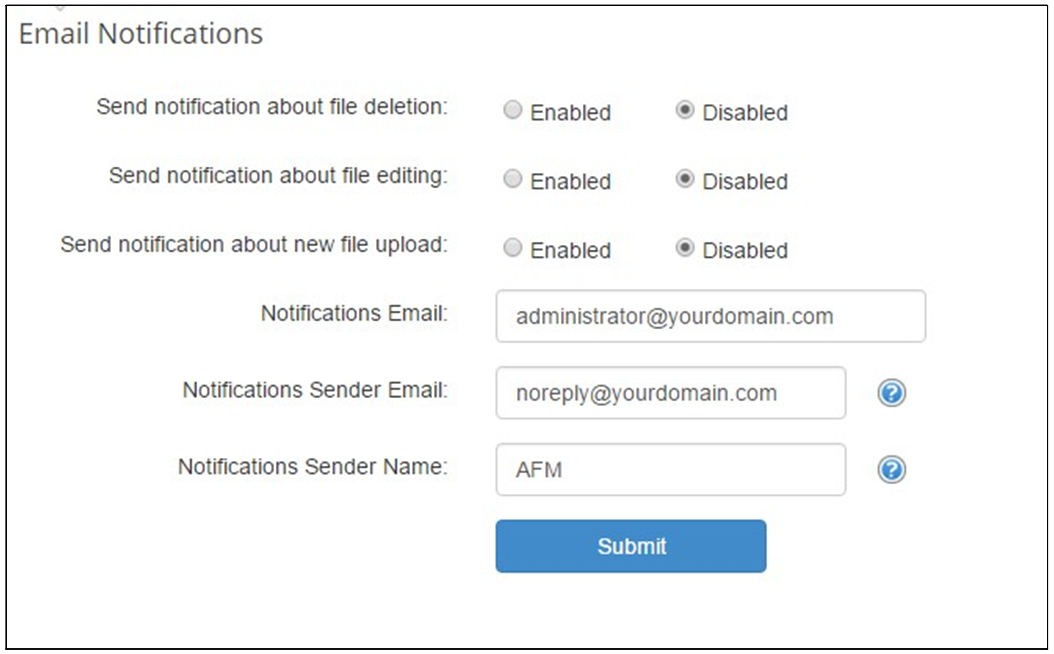
First screen which you will see will be Email Notifications:

First three settings are pretty easy to understand – it’s basically an on/off switch for 3 events happening in AFM: file deletion, file editing, file uploading. You need to define, whether you as admin want to receive notifications when such events happen.
Notifications Email – this is where script will be sending these notifications.
Notifications Sender Email – this is the email address which will be used as sender for these notifications. We highly recommend setting this to some mailbox which actually exists on the same domain where filemanager will be hosted. Example, if you host filemanager on abc.com/ filemanager – it’s good idea to create [email protected] and use that mailbox in the sender email address.
Notifications Sender Name – this can be anything you want really. This is the sender’s name for all the notifications sent from filemanager.
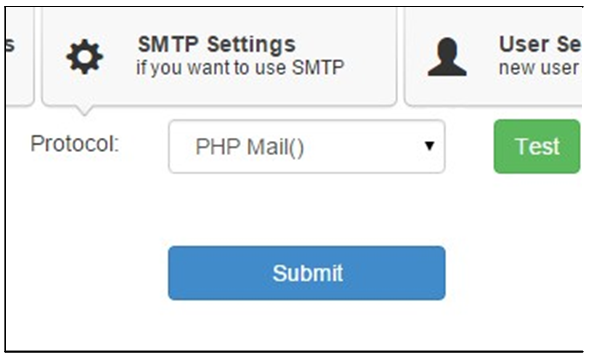
Next tab is SMTP Settings.

Since v3.0 we’ve added option to easily change how emails are delivered from filemanager.
If your hosting provider allows to send emails through default php mail() function – you don’t need to change anything.
If your hosting provider requires you to send all correspondence from website through SMTP
authentication – you need to change protocol to SMTP and fill out the form which will appear.
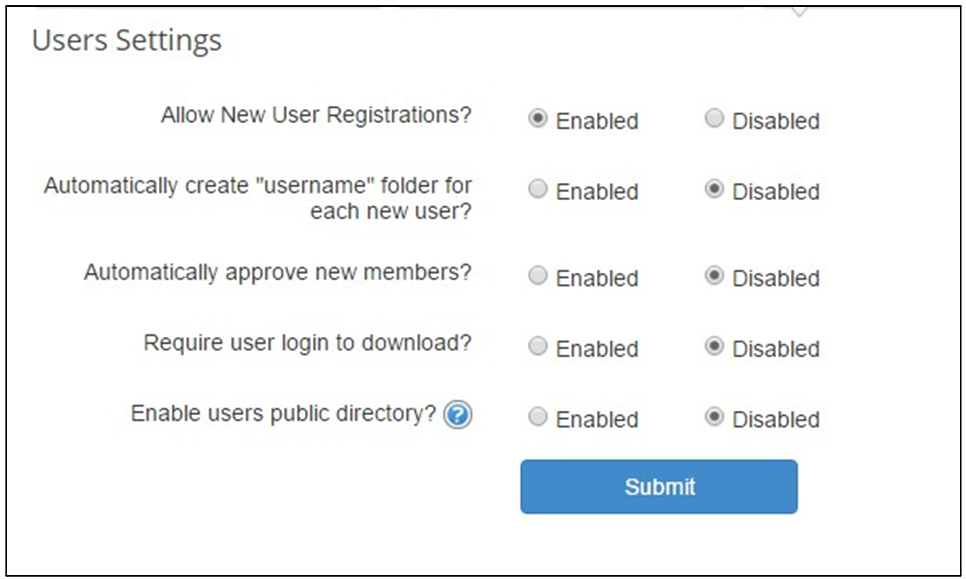
Next tab is User Settings.

Allow New User Registrations – if enabled, visitors will be able to register themselves on the login screen.
Automatically create “username” folder for each new user – if enabled, once user is registered on your site, system will create a folder with user’s name and lock user in that folder. Automatically approve new members – if enabled, all new users will be approved automatically and will be able to login as soon as they are registered and start uploading files. Also, if you enable this feature – you will see much more fields will appear on the screen, which will allow to set default disk quota and maximum filesize, allowed file extensions, assigned upload directories for all new members.
Require user login to download – if enabled, users will need to be logged in to download files which somebody shared with them. Option to share whole folder in this case will be disabled. Enable users public directory – if “require user login to download” is disabled, you will see this option on the screen, and if you enable it – when users will be viewing files, they will be able to share the whole folder which contains that file.
Final settings tab is Database Tools which is used only in rare cases when for some reason you need to make a quick database backup or restore database backup.
This is more of a “convenience” feature, so you wouldn’t need to go to hosting control panel and use phpmyadmin to download/upload the database.
After you’ve adjusted all desired settings in first 3 tabs – there’s nothing else you need to do in settings. You can start creating users/folders and upload files.
FAQ & Common Errors
You can find all the frequently asked questions and common errors/solutions for bookingwizz in this section
Technical Support
We provide courtesy support for all our products to our valued customers within 48-72 hours after receiving the request through our support ticketing system. Each purchase comes with 6 months support time. After that – you may either purchase extended support through the marketplace or purchase premium support with us.
If you need any help regarding the installation of the script or any other question please read through respective product documentation first and if solution is not found – open support ticket (please note, you will need to register account and you will be required to provide your license key (item purchase code) during the registration process, which will then be validated through CodeCanyon API. If your support period has expired you may either extend it with Envato or purchasepremium support from us).
Please note that we do not provide support by email. Any email related to support and not to pre-sales questions will be replied to after any other support tickets are resolved and in general will be directed to open a ticket, since we need to validate your purchase/support period validity.
For more details about our support policy and terms of service (including what is and is not included in Basic Support) click here.
Our business hours are Monday – Friday: 9:00am – 6:00pm (EST), and support is provided only at that time. Upon opening a ticket, we make it our goal to respond within 48-72 hours, however depending on the issue you’re having it may take a bit longer, but in any case we will address the issue within specified period of time with at least “resolution time” in reply.
Changelog
Quick Security Update (v3.0): (July 18, 2016)
– adjusted code in download_file.php and download.php (replace those files from fresh codecanyon archive)
– fixed issue with new file upload notifications (replace includes/server/index.php )
v3.0 (1 September 2015)
– completely new interface
– new installer / upgrade wizards
– new section – backup & restore
– switched mysql with mysqli for PHP 5.5+ support
– added option for admin to enable/disable public view of the directory (in system user settings)
– added multiple mail send settings (including SMTP)
folder changes
– option to assign new folders to all users at once
– option to assign new file extension to all users at once
– option to share folders (must be enabled by admin in settings)
– added option to create and sync sub-sub-folders
files changes
– added option to sync files from FTP. You can upload new files through FTP and then click FTP SYNC button to import those files into the file manager.
– added file previews (PDF files, txt files, code (bsh, c, cc, cpp, cs, csh, css, cyc, cv, htm, html, java, js, m, mxml, perl, php, pl, pm, py, rb, sh, xhtml, xml, xsl, sql, vb), images – (png, jpg, jpeg, gif, bmp), audio (mp3, m4a, oga, webma, fla), video (m4v, ogv, ogg, webmv, flv,mpg, mpeg, mov, divx, avi)
– integrated google code prettify for code files/txt previews
– integrated jPlayer for audio files previews
– integrated Flowplayer for video files previews
– integrated PDF.js for PDF previews
user changes
– added password generator
– added option to create folder for each new user automatically
– added user profile section, so users could change their own passwords and information
– added setting to enable/disable requirement to be logged in to download shared files
– added confirmation email to user, when admin approves his/hers account, if user approval is enabled
– added option for automatic user approval, with extra settings like default quota, default filesize /
extensions and directories to be assigned to all new users automatically.
– password strength meter
– added option to set any user as admin
v2.1 (14 September 2011)
– small bug fix update
v2.0 (28 June 2011)
– assign multiple folders / sub folders for any user
– admin can upload files for any user into their folder
– added sub folders functionality
– added accordion style viewer for folders/sub-folders
– small css adjustments
– fixed undefined variables notice when adding user which exists
– fixed undefined variables on many different pages.
v1.4.1 (23 January 2010)
– added paging to all script sections!
– fixed ‘unknown sender’ issue for messaging.
v1.4 (29 December 2009)
– admin can now select upload directory before uploading file
– added option to download activity logs in CSV format
– added option to delete activity logs
– added option to enable user registrations (with notifications to admin and user)
– added option to enable new user auto-approval
– added forgot password option
– fixed download issue, now you have to be logged in in order to download file
v1.3 (6 November 2009)
– admin can now delete file messages
– admin can create folders
– admin can assign upload folders to each user
v1.2.1 (6 November 2009)
– Admin can now upload files too
– Admin can now change his password through users management screen.
v1.2 (12 October 2009)
– Messaging for file between admin/user (with gravatars)
– “New file message” notification for admin/user
– File extensions editor for admin
– Easy upgrade file from v1.1 to v1.2 for your convenience
v1.1 (7 October 2009)
– Link sharing (copy paste or send by internal mailer)
– Multiple file upload (swfuploader plugin)
– old single file upload for users with no js enabled.
– Admin notifications to email about file delete, upload, update
– Easy upgrade file from v1.0 to v1.1 for your convenience
v1.0 (9 October 2009)
– initial version released
Sources, Credits, Appreciation
We’ve used the following images, icons or other files as listed.
– Bootstrap by Twitter http://getbootstrap.com/
– Datatables https://www.datatables.net/
– jQuery Colorbox http://www.jacklmoore.com/colorbox/
– SwiftMailer http://swiftmailer.org/
– jQuery Library – http://www.jquery.com
– Lobster Font by Pablo Impallari https://www.google.com/fonts/specimen/Lobster
– jQuery UI Library – http://www.jqueryui.com
– jQuery Tools – http://jquerytools.org/
– pdf.js http://mozilla.github.io/pdf.js/
– jPlayer http://jplayer.org/
– Flowplayer https://flowplayer.org/
– Google Code Prettify https://github.com/google/code-prettify
This plugin uses pdf.js to render pdfs. Pdf.js is being developed by a very solid team, but it is still in beta, which means that it may not render all PDFs 100% correctly.
Once again, thank you so much for purchasing our product and we hope you will enjoy using it!


